Showing posts with label easter. Show all posts

Tuesday, March 15, 2022

Wooden Bunny DIY

 If you aren't following along on Instagram what are you even doing?😂 Please join me so you can see my latest DIY, craft, recipes and more!  @paperpaintandpine

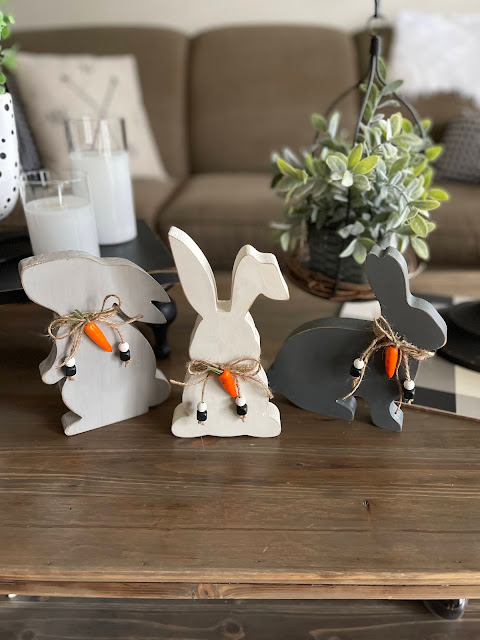
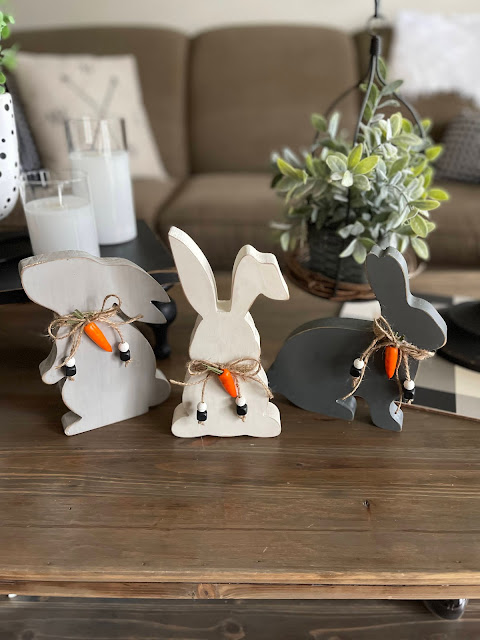
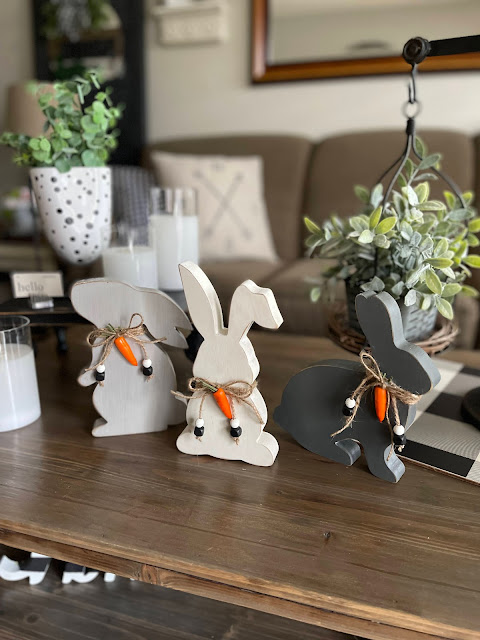
I was in Target and saw these adorable wood bunnies for just $5.00 a piece and they had three styles so I immediately started thinking of all the ways I could make them adorable but settled on neutral paint and absolutely love them!  You could certainly do so much more than just paint them a solid color but for me I wanted them to just blend in and be simple and sweet.  Such a fun and easy little makeover!

I simply sanded each bunny lightly to smooth the edges and then chose three colors of paint which ended up being white, light gray and charcoal gray.  I let them dry then sanded them lightly so reveal some of the wood and then coated them in Special Walnut wood stain to give them an aged look.  I then painted some little beads to coordinate with the bunny colors and then put those on a strand of twine and tied it around each bunny and then added a cute little carrot that came from floral picks at Michael's.

Aren't they just the cutest little things!?
So easy to make them over and they are still available at Target!  
If you want to purchase them click HERE.

I also have found several items on Amazon that would work for this project as well:
Another wooden bunny option

Thursday, March 29, 2018

Personalized Easter Basket with HTV World

If you aren't following Paper, Paint and Pine on Instagram you should!  You can also visit the Shop for paper goods and some handmade wooden items like Key to Decor Beads?

I was not financially compensated for this post. I received a sample for review purposes. The opinions are completely my own based on my experience.
 I don't know if you've heard but I have a new niece.  She's 4 months old and it's her first Easter!  I am looking forward to having a basket for her filled with cute girly things however I needed a cute basket first.  I searched Pottery Barn Kids and they were cute but didn't wow me so I decided to go the inexpensive route and make my own.  Two of my favorite things...budget friendly and a craft!
Personalized Easter Basket with Heat Transfer Vinyl
  Have you guys heard of HTV World?  They are a shop that specializes in all kinds of Heat Transfer Vinyl!  Here is what they say about their shop:
 "If you’re looking for some of the best heat transfer vinyl on the market you’ve come to the right place. We carry Siser heat transfer vinyl.
Heat Transfer Vinyl World let’s you shop your way. By COLOR. Choose your base color and see hand-picked accent colors that complement any color for any project. Never get stumped again and find colors that work for you.
HTV World is dedicated to making your shopping experience a breeze."
They have such an easy way to shop because every color gives you several coordinating colors and styles of heat transfer that will go with your pick.  I loved shopping with them and they have a great assortment of styles and the quality is top notch!
 I found my cute little bunny basket at Target in their dollar section for and knew I had to do something to make it just a bit cuter so I went straight to HTV World and snagged some colors that would work perfectly for her basket.  I went with pale pink, white glitter and solid white but didn't end up using the solid white for this project so I'm sure you will see another post down the line where I use it.
 I used my Silhouette machine to create the decal using just her first name and then mirrored the image and cut it out of the pale pink and then the glitter white.
Personalized Easter Basket with Heat Transfer Vinyl
  Once my HTV was cut I did the weeding (taking off excess material around the letters) and prepared my iron to get it ironed on.  I dumped the water out of my iron so there wouldn't be any steam and set it to the linen setting and let it get good and hot.  
 I then placed my decal using the glitter htv first and due to it being a curved surface I did cut the word in half to make it a little straighter. 
Personalized Easter Basket with Heat Transfer Vinyl
I placed my basket over the end of my iron so I had a surface to press the basket and decal on.
Personalized Easter Basket with Heat Transfer Vinyl
 I then placed a thin piece of fabric over the decal to protect it from melting onto my iron.  I just use a tshirt and just use one layer of it and it works great.
Personalized Easter Basket with Heat Transfer Vinyl
 Once the tshirt was covering it I placed my hot iron on it without moving it too much so it wouldn't move the htv.  Once I knew it was secured enough to the basket surface I started slowly moving my iron over it while applying pressure and then once the backing was coming off the vinyl I slowly removed it and had an adorable basket!
Personalized Easter Basket with Heat Transfer Vinyl
 After I did the glitter layer I then placed the pale pink layer over top of it but moved it just slightly over so the white glitter would just peak out.  Most people would probably put the smooth vinyl down first and then do the glitter but I wanted the glitter to just be an accent.
 How easy is that?  So simple but creates the cutest little basket for so cheap!
 
Personalized Easter Basket with Heat Transfer Vinyl
 Isn't it so cute?  I just love that little accent of glitter sticking out!

Personalized Easter Basket with Heat Transfer Vinyl
Moral of the story?  Go visit HTV World for your heat transfer projects!

Personalized Easter Basket with Heat Transfer Vinyl
Happy Easter!

Sunday, March 18, 2018

Do It Yourself Faux Robin's Eggs

Oh where has the time gone?  I feel sad that I haven't blogged in such a long time but also I feel like so much work goes into blogging and sometimes I wonder if anyone is reading because most the time I get very little response to my posts.  That all being said I miss sharing my creative adventures with you.  I thought I'd kick off with a super simple project for spring or Easter.

I know a lot of places are carrying solid wood eggs or even just white plastic eggs and either would work for this project.  I used solid wood eggs from Target.  I found them in the dollar spot so you can't beat the price. I then bought a bottle of acrylic paint from Target in a color called Robins Egg.  Perfect name for this project.

 Perfect for your spring decor!

I picked up this brush at Lowe's Home Improvement and love it for anything that is round like finials or beads or candle sticks...you get the idea.  Makes brushing paint onto round object so much easier!

I painted all the wooden eggs with 2 coats of the acrylic paint and let them dry well before I started adding the spots that a typical Robin's Eggs have on them.

These are perfect just with the plain paint on them too so feel free to stop at this step!
Just start lightly dabbing the paint on with your toothpick.  I went through a couple toothpicks because they would flatten out and the spots got too big but that is fine if you like that look.

Don't worry if all the dots aren't the same size or if they get a little smeared. They don't have to be perfect because in nature they wouldn't be perfect either.  That is it!

Put them back in the cardboard holder or a cute egg basket and you are all set with another cute decor item for spring!

 Don't mind the large black TV behind this little vignette...it just happens to be where I needed to add a little something to spring this area up.

  Happy Spring my friends!


Don't you love a quick and simple DIY?  I know I sure do! 


Sunday, April 8, 2012

. . . Easter House Tour . . .


Happy Easter from Itsy Bitsy Paper!!

 • • •
This is the card I sent out to some of our family this year.  I love creating an Easter Card each year because of all the bright color options. 
  • • •
Today is the LAST day to enter your projects and recipes to the Hippity Hop Easter Project Hop. 

I hope you enjoy my Easter House Tour--pretty short and to the point but I hate that it will all be coming down after tomorrow and I thought it would be fun to share with you.

Little White Bunnies from Pier 1 Imports.  I added the little flowers to each of their ears for a bit of a springy touch.

Floral topiary, bird houses and cute little wrought iron bike from Michael's.  I made the bird houses and topiary

Spring Art Download and Yarn Trees that I made last year

Washi Tape Wrapped Candles (this post is soon to come)
And...the dollar store Easter jars that I used hair elastics to add a pop of color

 Another vase with a candle in it that I wrapped hair elastics around for more color

A fun download I found online (I wish I could remember where) and then my moss bunny topiary

Hair Elastics gone wild...


Dining Room Table with my favorite Easter Bunnies!  These came from Target last year and have been one of my absolute favorite Easter item I have.  They are so pretty and colorful!

That little bunny in a jar and a pop of color added to my old shutter by using some bright spring flowers

 Do you remember the Homemade Milk Glass flower arrangements from last year?  I love how these bottles turned out!  So simple and fun to do with adding some white paint on the inside and of course a bit of Baker's Twine and you have a pretty display of colorful flowers.

Enjoy your day!!

Saturday, March 24, 2012

. . . Grassy Spring Wreath . . .

I seriously think there needs to be a 12 Step Program for Pinterest "Abusers"--I'd be one of the first in line because I'm totally hooked on Pinning.  So when I saw this amazing new series that several bloggers are doing called Pinspired...Rewired I knew I had to be a part of it.

There are four blogs hosting it and each month there is a new challenge based on your Pinterest Inspiration.  The host blogs are The Gunny Sack, Southern Lovely, Family Ever After and Gingersnap Crafts.  This month was all about Wreathes.  I love making wreathes so this was just the project for me.  

I have had this adorable "Grassy" Wreath by Capture The Details marked as a "must make" wreath but hadn't gotten around to it until now.  I wanted to put my own spin on it so mine is a bit brighter and maybe not as "grassy" looking as hers is but I like how mine turned out.  When I walk by it I just want to smile because of the bright springy colors! 

**Inspiration Wreath from Capture The Details
Pinned to my Get Your Craft On Board
 • • •Grassy Wreath

 • • •You will need:
 Wreath Form
Yarn
Flower embellishments
Pearl Head Pins or any color pin you so desire
A decorative tag or other embellishment of your choice
Ribbon for hanging
Floral Picks (optional)

Friday, March 23, 2012

. . . Fun Friday Finds--Bunnies . . .

With my Hippity Hop Easter Project Hop going on now I am really tuned in to Bunny Projects.  There are so many cute ones floating around.  I love seeing all the different ways people create bunnies so I wanted to share a few of my favorites for Fun Friday Finds.
 

• • • Bunny Bonanza

Sunday, March 18, 2012

. . . Hippity Hop Easter Project Hop . . .


I love hosting Holiday Inspired Linky Parties!  With Easter just around the corner it's time for the 
Hippity Hop Easter Project Hop 
I hope you will join in on the fun and
GRAB a button to post on your blog so your readers can hop over and link up their projects and recipes.

 • • •happy EasteR 
 • • •
 
For this Linky Party:

**Please become a follower of Itsy Bitsy Paper's Blog

**Link ONLY Easter and Spring Project Ideas and Recipes

**Link back to Itsy Bitsy Paper Blog in your post

**Feel free to leave a comment below as well

That is it....Let's Party!
Please spread the word about this fun party!

Sunday, March 18th until Sunday, April 8th

BE SURE TO FOLLOW ITSY BITSY PAPER BLOG