Monday, September 16, 2013

. . . Tagg Pet Tracker Genius . . .

 This post is part of a social shopper marketing insight campaign with Pollinate Media Group™ and Tagg™ Pet Tracker, but all my opinions are my own. #pmedia #pettracker  http://cmp.ly/3/8vNxcO.

Anyone that knows me well knows that my dog is my baby.  The running joke in our house is that I love Maggie more than my son.  That is only true on occasion but I do love my dog.  

When I had the opportunity to try this new product by Tagg Pet Tracker I jumped at the chance.  I am terrified of losing my Maggie Girl and this is a way to keep track of her as well as all the other great benefits of the device.  

Maggie is a rescue dog so before she came to us she was allowed to run free on her owners property but with us she can't do that.  We have had her get away from us a couple times and thank goodness we were eventually able to get her back but the time she was gone was just torture for us because of not knowing where she went.  The worst is when she has gotten loose and doesn't respond in any way to us calling her and she moves so fast we can't catch up to her so we just have to keep guessing where she might go.  No MORE of that guessing game now that we have Tagg Pet Tracker.  You have no idea how much peace of mind this little device has given us.

This little baby was so simple to activate and to use.  It was just minutes and we were up and running.  Nothing short of awesome in our opinion.  

Saturday, September 7, 2013

. . . kitchen artwork . . .

My parents bought a new house and have been very busy decorating.  They had a wall in the kitchen that my mom couldn't decide what to add to fill the space.  While we were shopping for something I had the idea to just create a few kitchen prints and put them in very simple black frames.  This was a super easy project and yet is one of the things she hears the most compliments on.  Yay!

If you aren't comfortable creating your own artwork you can either purchase these by emailing me or go to Etsy and you will find a ton of great downloadable files.  You will just send the files off to the photo center of your choice and then buy some basic frames and some scrapbook paper to mount them on and stick them in the frames.  Can't get easier than that right?

 • • • 
Once I created my artwork I sent them to Costco Photo for them to develop them.  I did have to call them to speak with them about the size because I chose to do squares.  Once the photos were developed I mounted them with adhesive to a bronze piece of scrapbook paper and then cut that to the size I wanted it--mine were 10x10.  I then mounted that to a 12x12 piece of black cardstock and put them in the frames.  So simple!
 
 Easy as can be but looks great and a super inexpensive way to fill up blank wall space!

Kitchen Art Complete!

Saturday, August 31, 2013

. . . Labor Day Weekend Sale . . .

Itsy Bitsy Paper is having a Labor Day Weekend SALE!!  30% OFF all purchases Saturday, August 31to to September 2nd.  This is a great time to start buying little gifts for all the special people in your life...neighbors, teachers, babysitters, friends, relatives and so on.   Also some great new designs have been added to the shop this week so be one of the first people to order the new designs.


Wednesday, August 28, 2013

. . . Oven Baked Cheeseburger Sliders . . .

In our house we are big burger lovers but when burger sliders come on the scene we were obsessed!  I have bought slider presses and have been happy with the results other than the fact that they shrink so much when cooked so it isn't quite the right size burger for the bun and so on.  Burger Slider Problems!  Until now...I was cruising Pinterest one day and saw a post on these super simple sliders.  The photo didn't link to any website so I just used the idea and came up with my own recipe.  Today while I was writing this post I Googled the idea and sure enough I found the website that the original idea came from here!  Her recipe is super simple as well but mine uses a bit of a different technique. 

You are going to love these for serving just a few or a big crowd!  

My husband walked in as I was pulling them out of the oven and he said "Oh man these are just like White Castle Burgers!".  Then he and my son proceeded to eat most the tray of them.  I will for sure be making these at my son's next sleepover because they are a great snack for middle of the night cravings that kids always seem to get when they are staying up most the night.
You will need:
Ground Beef-I used 1 pound of 93% lean and 1 pound of 85% lean
1 or 2 slices of bread
1 egg beaten 
1/4 Cup to 1/2 cup of milk depending on how much your bread takes to absorb it all.
Hamburger Seasoning or just salt and pepper
Slider buns of your choice
Cheese of your choice--I used Kraft Singles but these would be good with any flavor
My mom always talks about my great grandpa making burgers on the grill using this technique and it will make your burgers great every time!  Shred up a slice or two of bread depending on how much meat you are using.  I used 2 slices for the amount I made.  Then pour your beaten egg over it and slowly pour your milk over until the bread absorbs most of the moisture.  
Combine the meat in a bowl and then flavor with McCormick's Hamburger Seasoning.  Mix meat and seasoning until combined.
Add your milk, egg and bread "slop" to the meat and mix into the meat mixture until well combined.
 Spray a shallow baking pan with cooking spray then press meat mixture into the pan and poke some "breathing" holes in it with a fork.  I used a small cookie sheet because of using 2 pounds of meat but if you wanted to use a smaller amount of meat just use a smaller pan.  Bake in the oven at 400 degrees for 30 to 45 minutes or until done to your liking.  

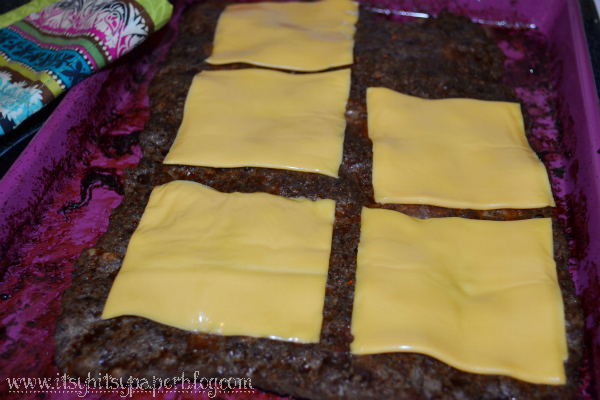
 Pull burger out of the oven and drain all the grease off.  I used a paper towel across the top of mine as well.  Then place slices of cheese over the whole pan of meat so you will have cheeseburgers when you are done.  Place back in the oven just until cheese is melted.  Remove and cut into small square to place on your slider buns.

Serve how your family likes their burgers.  At our house that means ketchup, pickles, mayo and lettuce.  We all love baked beans and cole slaw as our sides when we have burgers too.  Yummy!

I gave you this recipe just in time for the Labor Day weekend because I know many of you will be feeding a crowd and these would be perfect for that.  You're welcome.

Thursday, August 22, 2013

. . . Golden School Year Printable . . .

 Every year I look forward to spoiling our teachers with cute treats and that includes sending something on the first day of school.  This year I went through my list of ideas and decided to create a cute tag for a "Golden" school year and attach the tag to a package of Golden Oreo Cookies.  Couldn't be cuter or easier and lucky you I've shared the tags as a printable!  I hope your teacher loves getting this sweet treat.

 Hoping you have a GOLDEN school year!


 Print your tags from the link at the bottom of this post.  
Cut them down to size then punch a hole in the corner and tie them to a package of Golden Oreos.  If you wanted to layer your tag like I show here just cut another layer a bit larger than your tag and then use washi tape around each corner to "seal" it.  Easy Peasy!

 Tie a couple strands of baker's twine or ribbon around the package of cookies then attach your cute tag and you are ready to give your gift!

A Sweet Treat for you teacher!
 

Wednesday, August 21, 2013

. . . Write Teacher For Me 2013 . . .

This post is one of my most popular for both Teacher Appreciation and Back to School treats for the new teacher so I'm sharing it again.  I used Pens and Pencils from the $1 bins at Target and made another cute treat for our 5th Grade Teacher.

Updated 2013
• • •
It's almost time for the kiddos to go back to school, (yay )how sad!  Back to school means thinking about a small treat for the new teacher and this is the perfect little "something"!  Every classroom needs a pile of pencils or pens so this is an all purpose gift for any teacher in any grade.

You may remember I did this the last  2 years but I've updated the tag download for you and changed up the style of my finished product thanks to washi tape.  Both download links are at the bottom of the post.

To make tags like I did you will need:
A sheet of 8.5 x 11 inch card stock
A small hole punch
Package of pencils (I bought 4 packages of pencils from the Dollar Store--2 packs for girls and 2 packs for boys so no one was left out when the teacher puts them out)
Washi Tape
Card stock for layering
Twine or Ribbon 
*To do a super fast treat just cut out the label color you want and tape it directly to the package of pencils

Teacher Gift
• Print out your tags from the download link below and gather your supplies
• I did two packs of pencils in boy colors and two packs in girl colors
• Cut out the label in the color selection that works for you
• Cut small strips of washi tape for the corners of each square tag

• I added a small piece of washi to each corner of my square tag
• I then folded the excess around the back of the square tag and trimmed it.  Using the washi tape is strictly optional but I liked the added pop of color

• I attached my finished tags to a black piece of card stock and cut it out and punched a small hole in the corner to thread my twine through
• I bagged the pencils in clear cello bags and tied them with a piece of twine

• I attached my tags to each bag by tying them on with a piece of baker's twine
• I taped a few pieces of washi on the bottom of the bags for another pop of color 
• You are all set!


Write Teacher

FUN!

Back to school
Write Teacher Download Update Write Teacher For Me 

Monday, July 1, 2013

. . . Homemade Rhubarb Crisp Recipe . . .

Growing up we couldn't wait for my Grandma and Grandpa's garden to have rhubarb ready for my mom to make us yummy desserts.  Now that I'm a mom I too can't wait to make things with Grandma's yummy rhubarb fresh from her garden.
I make a really good Sour Cream Rhubarb Pie (I need to share this recipe sometime soon) and Stewed Rhubarb and Rhubarb Cheesecake but this new recipe for Rhubarb Crisp came from my other Grandma and it's amazing!  My son loves when Grandma sends batches of Rhubarb from her garden because he knows it means something sweet for us to eat.  
This recipe was so easy and even if you don't have fresh rhubarb from your garden it's worth going to the store for some so you can make this.  It would also be really good with some sliced strawberries added in.  I think next time I may give that a try.

 This recipe was first made by my Grandma but she found it from one of my favorite cookbooks called The American Country Inn and Bed and Breakfast Cookbook.  If you don't have this book it is well worth getting.  I have never made a bad recipe from it and it has just about everything you could want in it.

  You will need:
4 to 5 Cups Chopped Rhubarb
1 Cup All Purpose Flour
3/4 Cup Uncooked Oatmeal
1 Cup Packed Brown Sugar
1/2 Cup Melted Butter or Margarine
1 Tablespoon Cinnamon
1 Cup Sugar
1 Tablespoon Cornstartch
1 Cup Cold Water
1 Teaspoon Vanilla Extract

 To Make the Rhubarb Crisp:
Combine the flour, oatmeal, brown sugar, butter and cinnamon in a mixing bowl until crumbly.  Press 1/2 the crumb mixture into a 9x13 inch baking dish.  Cover with the chopped Rhubarb.

 In a small saucepan combine sugar and cornstarch.  Stir in water and vanilla and turn on low heat and stir frequently until mixture has thickened.  Pour mixture over the Rhubarb.  Top with remaining crumb mixture.  Bake in a 350 degree over for 1 hour.  Serve warm or cold with vanilla ice cream or cool whip.  Serves 10 to 12.

We enjoyed every last bite of our Rhubarb Crisp and hope you will too!