Showing posts with label halloween. Show all posts

Tuesday, September 27, 2016

Soda Carrier Halloween Treat Basket Revisited

This is a post I did for a previous Halloween season but I loved how it turned out and it made such a great gift so I thought I'd share it again for any of you that didn't see it the first time around.
. . . 
I am always trying to think of unique gifts that allow me to get crafty.  I also think that everyone likes to get a gift that you've put some effort into.  This originally started out as a teacher treat idea but we have 5 teachers this year and this was getting pretty pricey to do for 5 different teachers.  I decided that these were going to a few special people that I needed a little something for.  I also decided that I'd do a variation on it for teacher gifts.  

I also love a good printable so this allowed me to create this cute "Trick or Treat, Smell my feet, give me something good to eat" gift tag to share with all of YOU!  You can use this for all different treats and for all different people--coworkers, teachers, your child's classmates, Sunday school teachers, etc.  I am planning on doing the same idea but on a smaller scale for classmates and my son's teachers.  I think I'm going to just package the smaller version in cellophane bags and attach the tag with a cute piece of ribbon or baker's twine.  Easy peasy, don't you think?

You will need:
4 Pack soda carrier 
Spray paint or something to cover your carrier box in
Embellishments such as washi tape, ribbon, stickers, etc.  Most everything you see in my project came from Michael's.
Treat Tag that is available as a FREE download at the bottom of this post
I first filled the inner section of my box with tissue paper so the paint wouldn't get inside and then I covered the handle with tissue as well so that it could be left the orange stripe.

I then used cheap black spray paint and covered the entire box (including the bottom).  I used several light coats and let each dry before applying more because I wasn't sure if the cardboard would wrinkle if it got too wet.  Let the box dry completely.
I removed the soda bottle labels with adhesive remover and then washed them with soap and water to get rid of any residue.  Once they were dry I used this awesome washi tape that came from Michael's.  It's all "drink" related so it was more than perfect for these bottles of soda.  I then added a single sticker to the top of the bottle and I added orange and black baker's twine right around the top of the bottle for an extra pop of color.

I then wrapped the top of the box with a piece of washi tap and added a cute sticker to the handle.  It's not very noticeable with all the treats in it but when they empty it out it looks more finished.  

I then used 3 different patterns of washi tape to wrap around the entire box.  This adds a nice pop of color as well.  The tape may not stick right if your paint isn't completely dry.
I filled my soda carrier with 2 bottles of soda and the 2 empty holes with lots of Halloween candy.  I also didn't like that the sucker label was so bright so I just covered it with a piece of washi tape and it fixed it perfectly!
I added a cute little paper banner by attaching it with glue dots.  This also came from Michael's.  I then printed and cut my treat tags and attached the tag with a cute black and white chevron clothespin.
 This project looks so cute and like it might have taken a lot of time but honestly other than the spray paint and removing the labels from the soda it was done in about 15 minutes at most.
The Trick or Treat Tag was designed by Itsy Bitsy Paper (yours truly).   The little witch feet graphic were provided by Doodles First.


 Lots of great Halloween treats are packed in this little soda carrier.  I was surprised at how much candy it took to fill the holes up.  If you were low on candy just fill the base of each "hole" with tissue paper or paper shreds and then it won't require so much.
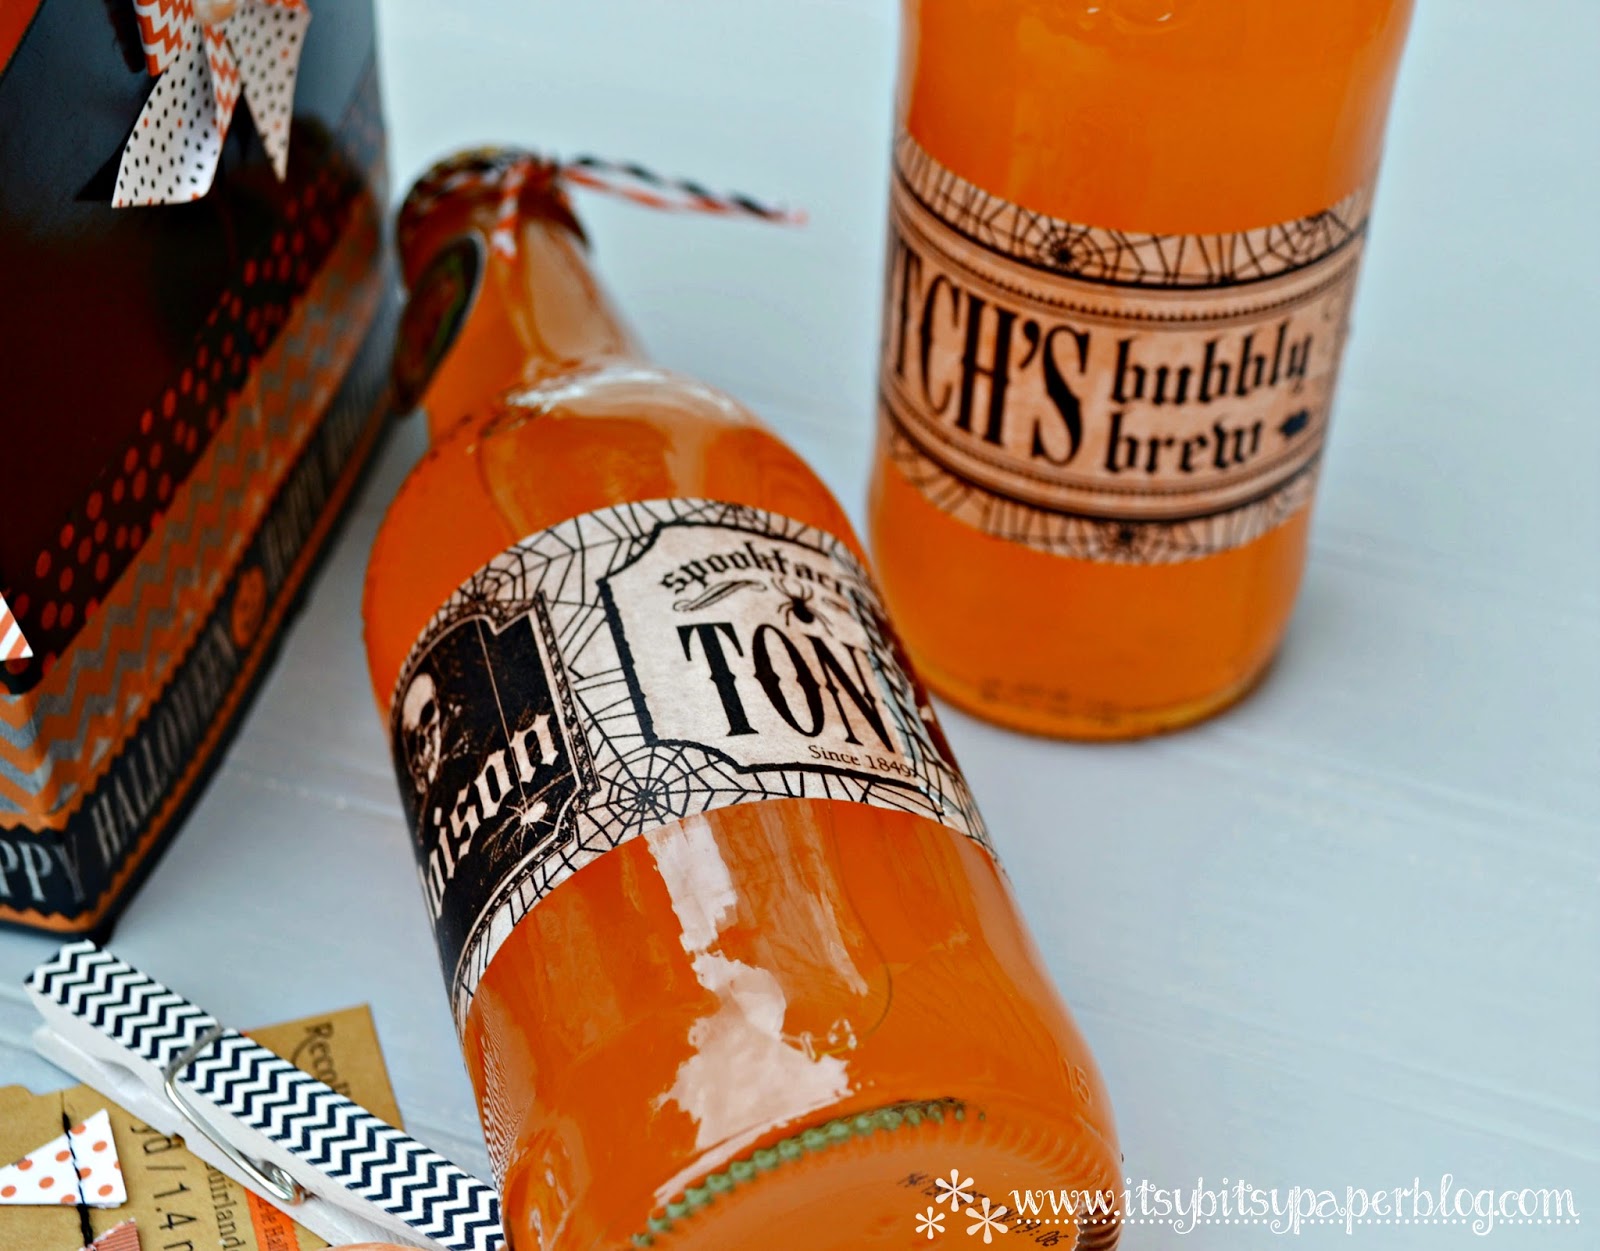
 *Update:  This washi tape may not be available anymore since this is a repost from a previous Halloween season.
 This is probably my favorite part of this whole project.  I was so excited when I saw this drink inspired washi tape at Michael's and knew I had to buy it but had no idea what I was going to do with it.  It was the perfect addition to this little project.  I am thinking that for the school teachers I'm going to use plastic bottles of orange soda and relabel them with this tape.  I don't trust my son to carry a bunch of glass into school!
Happy Halloween!
 This little Halloween treat tag just made for the perfect pop of color on the completed Soda Carrier.
  
The free treat tag printable is for personal use only!  Jut download and print on an 8.5x11 inch sheet of card stock and cut down to size.  Perfect!

Sunday, October 18, 2015

Knock if you Dare Halloween Yarn Wreath

Finally the weather is feeling like fall here in North Carolina!  I wasn't sure it was ever going to happen but the leaves are changing colors and starting to fall and the temps are getting chilly!  We even had to turn our heat on just this morning!  Yay!  It's my favorite time of year.  I love decorating for Halloween and Fall but this year I didn't feel like using any of the wreathes I've made in the past so I wanted to do something different.  

This was a total last minute decision because I was cleaning up some old craft supplies and found a ton of Halloween colored yarn and figured I would whip up a quick Yarn Wreath.  I also remembered I had this cute Knock if you Dare sign I had picked up at Home Goods last year on clearance for 2 bucks.  A little ribbon and it's done.  I realize it's not a very exciting wreath but simple and colorful made it work for me.

 If you've followed along with my blog over the years you know I love making yarn wreathes.  The best part is you can make them look different every single time depending on the yarn you use and the embellishments you add.  If you want to see a few of the others I have shared you can click here or here or even search my sidebar for yarn wreath for more.
 You will need:
Wreath form in the size and shape you would like for your wreath
Yarn--the more colors and texture the better in my opinion but for this one I used yellow, green, orange and two shades of purple
Floral pins
Flowers, plaque, ribbon or any other embellishments you'd like to add
 These floral pins are the bomb diggity!  I use them for just about every wreath I make and find they come in handy for lots of other projects too.  I buy them at Hobby Lobby or Michael's and try to always keep them on hand.
 Start with all your yarn lined up the same length and use the floral pin to hold the starting point of your yarn in place.  Make sure you pin it to the back side of the wreath so you can't see it.  Then just start wrapping the yarns around the wreath form.  I try to lay my yarns out "flat" instead of a big clump so that you can actually see all the colors.  You also want to pull the yarn very tight and keep it close together so your wreath form doesn't show through.  

You can also use several strands of the same color of yarn if you want a more dominant color to show up.  I wished I had used a couple strands of purple instead of just one of each shade but that's ok.  

After I finished wrapping the plain yarns I finished it off the same way I started it by pinning the yarn ends to the back side of the wreath with the floral pin.  I wasn't happy with the wreath because it didn't have any dimension so I took orange fluffy yarn and wrapped it around so it had a little extra oomph to it.  I didn't wrap it close together so it's spread out but you could either incorporate that fluffy yarn with the other yarns you used from the beginning or just add it after for a more subtle effect.
 I then took my sign and attached it with floral pins to the wreath.  You can barely see them so I didn't worry about hiding them but if you wanted to make them more concealed just cover them with a bit of yarn.
 I then took a wide piece of grosgrain ribbon and tied it to the sign to complete it. 
 Easy peasy and works perfectly for when the trick or treaters come around!
 Knock if you dare!

Wednesday, October 8, 2014

. . . Soda Carrier Treat Basket and Halloween Blog Hop . . .

I am super excited to be participating in the Delightfully Wicked Halloween Hop that Delightfully Noted puts on each Halloween.  When she asked me to do it I didn't need a second to think about it and pretty much knew immediately what I was going to share because it was already on my list of "to dos".  I am honored to be part of this great group of bloggers that are sharing projects today.  I hope you will stop by all their blogs and check everything out and be sure to share the links as well so no one misses out!

BE SURE TO CHECK OUT THE GIVEAWAY at the bottom of this post!  It's easy to enter and you never know...you might be the winner!
 

• • •
I am always trying to think of unique gifts that allow me to get crafty.  I also think that everyone likes to get a gift that you've put some effort into.  This originally started out as a teacher treat idea but we have 5 teachers this year and this was getting pretty pricey to do for 5 different teachers.  I decided that these were going to a few special people that I needed a little something for.  I also decided that I'd do a variation on it for teacher gifts.  

I also love a good printable so this allowed me to create this cute "Trick or Treat, Smell my feet, give me something good to eat" gift tag to share with all of YOU!  You can use this for all different treats and for all different people--coworkers, teachers, your child's classmates, Sunday school teachers, etc.  I am planning on doing the same idea but on a smaller scale for classmates and my son's teachers.  I think I'm going to just package the smaller version in cellophane bags and attach the tag with a cute piece of ribbon or baker's twine.  Easy peasy, don't you think?

You will need:
4 Pack soda carrier 
Spray paint or something to cover your carrier box in
Embellishments such as washi tape, ribbon, stickers, etc.  Most everything you see in my project came from Michael's.
Treat Tag that is available as a FREE download at the bottom of this post
I first filled the inner section of my box with tissue paper so the paint wouldn't get inside and then I covered the handle with tissue as well so that it could be left the orange stripe.

I then used cheap black spray paint and covered the entire box (including the bottom).  I used several light coats and let each dry before applying more because I wasn't sure if the cardboard would wrinkle if it got too wet.  Let the box dry completely.
I removed the soda bottle labels with adhesive remover and then washed them with soap and water to get rid of any residue.  Once they were dry I used this awesome washi tape that came from Michael's.  It's all "drink" related so it was more than perfect for these bottles of soda.  I then added a single sticker to the top of the bottle and I added orange and black baker's twine right around the top of the bottle for an extra pop of color.

I then wrapped the top of the box with a piece of washi tap and added a cute sticker to the handle.  It's not very noticeable with all the treats in it but when they empty it out it looks more finished.  

I then used 3 different patterns of washi tape to wrap around the entire box.  This adds a nice pop of color as well.  The tape may not stick right if your paint isn't completely dry.
I filled my soda carrier with 2 bottles of soda and the 2 empty holes with lots of Halloween candy.  I also didn't like that the sucker label was so bright so I just covered it with a piece of washi tape and it fixed it perfectly!
I added a cute little paper banner by attaching it with glue dots.  This also came from Michael's.  I then printed and cut my treat tags and attached the tag with a cute black and white chevron clothespin.
 This project looks so cute and like it might have taken a lot of time but honestly other than the spray paint and removing the labels from the soda it was done in about 15 minutes at most.
The Trick or Treat Tag was designed by Itsy Bitsy Paper (yours truly).   The little witch feet graphic were provided by Doodles First.


 Lots of great Halloween treats are packed in this little soda carrier.  I was surprised at how much candy it took to fill the holes up.  If you were low on candy just fill the base of each "hole" with tissue paper or paper shreds and then it won't require so much.
 This is probably my favorite part of this whole project.  I was so excited when I saw this drink inspired washi tape at Michael's and knew I had to buy it but had no idea what I was going to do with it.  It was the perfect addition to this little project.  I am thinking that for the school teachers I'm going to use plastic bottles of orange soda and relabel them with this tape.  I don't trust my son to carry a bunch of glass into school!
Happy Halloween!
 This little Halloween treat tag just made for the perfect pop of color on the completed Soda Carrier.
  
The free treat tag printable is for personal use only!  Jut download and print on an 8.5x11 inch sheet of card stock and cut down to size.  Perfect!

Check out the entire Delightfully Wicked Halloween Hop below:


Thursday, November 1, 2012

. . . Trick or Treat . . .

Well, another year of trick or treating is behind us and now begins the crazy holiday season!  

We had Robin Hood and a Bumble Bee Pup at our house for trick or treat.  My son had so many costume ideas but went for Robin Hood, which is odd because he's never seen the movie and knows very little about the character.  I think it was the bow and arrow that sold him on it!  Maggie, the bumble bee pup, looked adorable too but she hated her costume.  She got lots of attention during trick or treat so I think that helped her adjust to the costume a little but she was not happy with me for putting her in it.  Lots of fun was had by all.

The Robin Hood and Bumble Bee Puppy

Visiting with Great Grandma and Mimi

 Showing off with his bow and arrow

The Maggie Girl in her Bumble Bee Costume

I hope everyone had a very Happy and Safe Halloween 2012!

Monday, October 22, 2012

. . . Spray Painted Owl Tealight Holders . . .

I love the Dollar Section at Target because there are some great craft items in those bins.  I also love owls so when I saw these Owl Tealight Holders I decided that I had to have a couple.  They are sold in packs of 2 and they are brown which didn't really work with my Halloween decor so I grabbed my can of white spray paint and went to work.  I love them now and am thinking I might have to grab a few more so I can use them in a Thanksgiving Centerpiece.  They are just so cute now!  You can't get a project much easier than this one...it took about 2 minutes.
 

spray paint transformation!
 
 • Grab your owls and spray paint
• Give them a good coat of the spray paint color of your choice.  Be sure to paint the back and underside too or the brown will show through
• Cute!  I also added a piece of black grosgrain ribbon around the tealight holder just to add a little something extra.

 Love!


 Halloween!


 So Cute!


Fun!


There really was absolutely nothing wrong with the owls as they were but I just felt they looked better in white for what I was using them for.  I love the idea of using them in a centerpiece as they are sold with an orange tealight and some gourds and pumpkins.

Sunday, September 16, 2012

. . . Juice Bottle Ghosts Revisited . . .


This post was one of my most popular Halloween Crafts last year so I thought we'd revisit it again.  These Juice Bottle Ghosts have to be one of the easiest things to make and they turn out so cute!  Here we go...

• • •
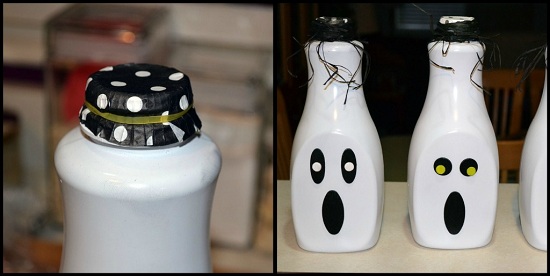
I buy Trop50 Orange Juice and I love the shape of the bottle.  I'm always brainstorming ideas on what I can do with them instead of tossing them out.  I decided to use up a few of my stash and make Ghosts for Halloween.  If I do say so myself I think they turned out really good.  My son just loved them when I put them out so anytime he is complimentary I know I'm on to something.


You will need:
 Tropicana OJ Bottle or something similar
Spray Paint
Wood circles and ovals or something similar to create the face
Black Rafia
Mini Cupcake Liners


• Spray Paint your bottles-this took several coats
•I purchased my bag of wood pieces at Michael's
• I layed out all the faces prior to spray painting them black so I knew which pieces to use


• Once the pieces for the face dry use E6000 glue to adhere them to your bottles
• Let them dry while laying flat or they will slip down the bottle--not pretty
• Use a mini cupcake liner to cover the top of your bottle.  You'll want to cut little slits all around it so it folds neatly.


Put a rubber band around the cupcake liner to hold in place while you wrap the bottle top with rafia ribbon.  Leave some "stringy" pieces for decoration


So much better than just tossing the empty bottles out, don't you think?