Showing posts with label dollar store craft. Show all posts

Saturday, March 23, 2013

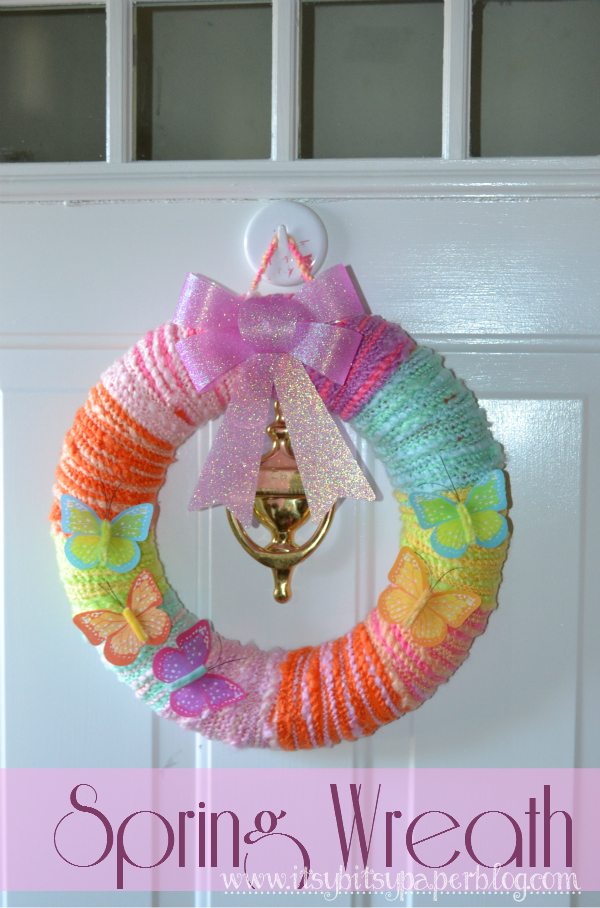
. . . Semi-Homemade Spring Yarn Wreath . . .

You know how you can make a "semi-homemade" dinner by using fresh ingredients along with prepackaged ingredients?  Well, this is a "semi-homemade" spring wreath using the same concept.  

I purchased the yarn wreath from Target this spring and then grabbed a few butterfly clips from Target's dollar bins and then used a plastic bow from Dollar Tree and my front door instantly looked cuter!  I have made a ton of these yarn wreathes so you could easily make your own but buying this one was so simple and I loved the colors for spring.  I have received a million compliments on it because everyone loves the springy look to it and the best part is that it was as simple as pie to make!

Happy Spring!

Just grab a wreath and embellish it from some cute things you can find in the dollar store or the bins at Target or Michael's.  

Fun and Colorful!

Monday, October 22, 2012

. . . Spray Painted Owl Tealight Holders . . .

I love the Dollar Section at Target because there are some great craft items in those bins.  I also love owls so when I saw these Owl Tealight Holders I decided that I had to have a couple.  They are sold in packs of 2 and they are brown which didn't really work with my Halloween decor so I grabbed my can of white spray paint and went to work.  I love them now and am thinking I might have to grab a few more so I can use them in a Thanksgiving Centerpiece.  They are just so cute now!  You can't get a project much easier than this one...it took about 2 minutes.
 

spray paint transformation!
 
 • Grab your owls and spray paint
• Give them a good coat of the spray paint color of your choice.  Be sure to paint the back and underside too or the brown will show through
• Cute!  I also added a piece of black grosgrain ribbon around the tealight holder just to add a little something extra.

 Love!


 Halloween!


 So Cute!


Fun!


There really was absolutely nothing wrong with the owls as they were but I just felt they looked better in white for what I was using them for.  I love the idea of using them in a centerpiece as they are sold with an orange tealight and some gourds and pumpkins.

Thursday, October 18, 2012

. . . Dollar Store Pumpkins Revamped . . .

I'm excited to be Guest Posting over on my friend Jennifer's blog today...Delightfully Noted.  She is hosting Wicked Craft Week and there have been some super fun posts so far so you'll have to drop by and say HI!  I know she'll appreciate you visiting.
 
 • • •
 I love taking something not so pretty from the Dollar Store and revamping it.  It usually just takes a little spray paint and you are in business.  These foam pumpkins are a perfect example of how a little Krylon Silver Spray paint and black craft paint make them look drastically different.  They remind me a lot of Mercury Glass with the shiny and matte mixed together.  I used some grosgrain ribbon to cover the seam on the pumpkin and grabbed some leaf gift tags from the Dollar Bins at Target and used up some black wire I had in my craft supplies.  Not a bag makeover if I do say so myself.  Perfect for the fall and Halloween.

I also used this paint technique on these pumpkins.  

Pumpkins!
 
You will need:
Dollar Store Foam Pumpkins
Silver Metallic or Mirrored Spray Paint
Black Craft Paint and a foam brush
Leaves (you can paint them like I did if you find paper leaves)
Some bendable wire to match (I used black)

• Gather your supplies
• Spray paint your foam pumpkins until they are coated on all sides
• Once the pumpkins are dry you will then use black craft paint and dab on black paint with a sponge brush.  I then used a paper towel to blot the black paint.  I worked in small sections to do this so it didn't get too dry before blotting it off.  I did this for the entire pumpkin and if there were spots I got too heavy I just used a little silver paint to cover it up.  In the final photos you'll see one of my pumpkins is darker than the other but that doesn't really bother me so I left them as they were.
• Let your pumpkin dry
• Use your gift tag leaves and put some black craft paint on both sides of them.  Let them dry well and then use some silver paint to just lightly brush on them for some "highlighting".
• Now your pumpkin is ready to assemble.
• I used floral hooks to secure the ribbon in place.  I wanted to use ribbon to cover the seam in the pumpkin because I didn't really like seeing that.
• Once the ribbon is in place secure it tightly with the floral picks.  These are the best little picks!  I used them all the time and just pick them up at the craft store in the floral section.
• Take a piece of flexible wire (preferably in black) and wrap it around a pencil or pen to achieve a "curly" look to it.
• When your leaves are dry you are ready to slide them on the curly wire and use the end of wire to poke down in the pumpkin
• You will use the very end piece of your wire to poke into the foam pumpkin.  Because it's bendable you can really play around with them until you get the look you are going for.

 Easy Peasy!
Love!

Fun!
Before & After

Saturday, October 13, 2012

. . . Dollar Store Fridge Liners . . .

This past spring our refrigerator went kaput and it was the perfect time to completely scrub it down and get everything cleaned out of it before it was repaired.  When I was cleaning all the shelves it clicked that I am crazy to not line my shelves and drawers with something so I can just wipe them down when there are spills or leaks.  I went off to the Dollar Store and grabbed a roll of contact paper and a roll of rubber shelf liner to make the contact paper non slip.  I didn't want to "glue" anything down but I didn't want the liners to move around either so the non slip shelf liner was perfect to stick the contact paper to.

This was a super simple project that took very little time and has been awesome to have ever since.  I did these back in the spring and they have been wiped down numerous times and still look as good as new and have not peeled or slid or anything since.  I love how easy it is now to clean up my fridge!  

After doing this little project I have seen so many great contact papers (at higher prices) so eventually I'll probably upgrade to something that is more of a match to my overall kitchen but for $2.00 I am a happy camper!  You can't beat that.  

 You will need:
Contact Paper
Non Slip Rubber Shelf Liner
Scissors

 • Gather your supplies and remove your shelves and drawers from the fridge
• For each shelf I turned it over and cut the non slip shelf liner to fit

 • I then took my cut piece of non slip rubber liner and placed it on the contact paper.  The great thing about the contact paper is on the reverse side there is a grid to help you keep your cuts straight.  I just cut a the contact paper slightly (very slightly) larger than the non slip liner and then peeled off the backing of the contact paper and stuck it directly to the non slip rubber liner and instantly I had a pretty "liner" for each shelf and drawer for fridge.

 • I used the same technique for each shelf and drawer and it came together perfectly. 

Brilliant!

 Love!

 Easy Peasy!