Sunday, October 18, 2015

Knock if you Dare Halloween Yarn Wreath

Finally the weather is feeling like fall here in North Carolina!  I wasn't sure it was ever going to happen but the leaves are changing colors and starting to fall and the temps are getting chilly!  We even had to turn our heat on just this morning!  Yay!  It's my favorite time of year.  I love decorating for Halloween and Fall but this year I didn't feel like using any of the wreathes I've made in the past so I wanted to do something different.  

This was a total last minute decision because I was cleaning up some old craft supplies and found a ton of Halloween colored yarn and figured I would whip up a quick Yarn Wreath.  I also remembered I had this cute Knock if you Dare sign I had picked up at Home Goods last year on clearance for 2 bucks.  A little ribbon and it's done.  I realize it's not a very exciting wreath but simple and colorful made it work for me.

 If you've followed along with my blog over the years you know I love making yarn wreathes.  The best part is you can make them look different every single time depending on the yarn you use and the embellishments you add.  If you want to see a few of the others I have shared you can click here or here or even search my sidebar for yarn wreath for more.
 You will need:
Wreath form in the size and shape you would like for your wreath
Yarn--the more colors and texture the better in my opinion but for this one I used yellow, green, orange and two shades of purple
Floral pins
Flowers, plaque, ribbon or any other embellishments you'd like to add
 These floral pins are the bomb diggity!  I use them for just about every wreath I make and find they come in handy for lots of other projects too.  I buy them at Hobby Lobby or Michael's and try to always keep them on hand.
 Start with all your yarn lined up the same length and use the floral pin to hold the starting point of your yarn in place.  Make sure you pin it to the back side of the wreath so you can't see it.  Then just start wrapping the yarns around the wreath form.  I try to lay my yarns out "flat" instead of a big clump so that you can actually see all the colors.  You also want to pull the yarn very tight and keep it close together so your wreath form doesn't show through.  

You can also use several strands of the same color of yarn if you want a more dominant color to show up.  I wished I had used a couple strands of purple instead of just one of each shade but that's ok.  

After I finished wrapping the plain yarns I finished it off the same way I started it by pinning the yarn ends to the back side of the wreath with the floral pin.  I wasn't happy with the wreath because it didn't have any dimension so I took orange fluffy yarn and wrapped it around so it had a little extra oomph to it.  I didn't wrap it close together so it's spread out but you could either incorporate that fluffy yarn with the other yarns you used from the beginning or just add it after for a more subtle effect.
 I then took my sign and attached it with floral pins to the wreath.  You can barely see them so I didn't worry about hiding them but if you wanted to make them more concealed just cover them with a bit of yarn.
 I then took a wide piece of grosgrain ribbon and tied it to the sign to complete it. 
 Easy peasy and works perfectly for when the trick or treaters come around!
 Knock if you dare!

Saturday, October 10, 2015

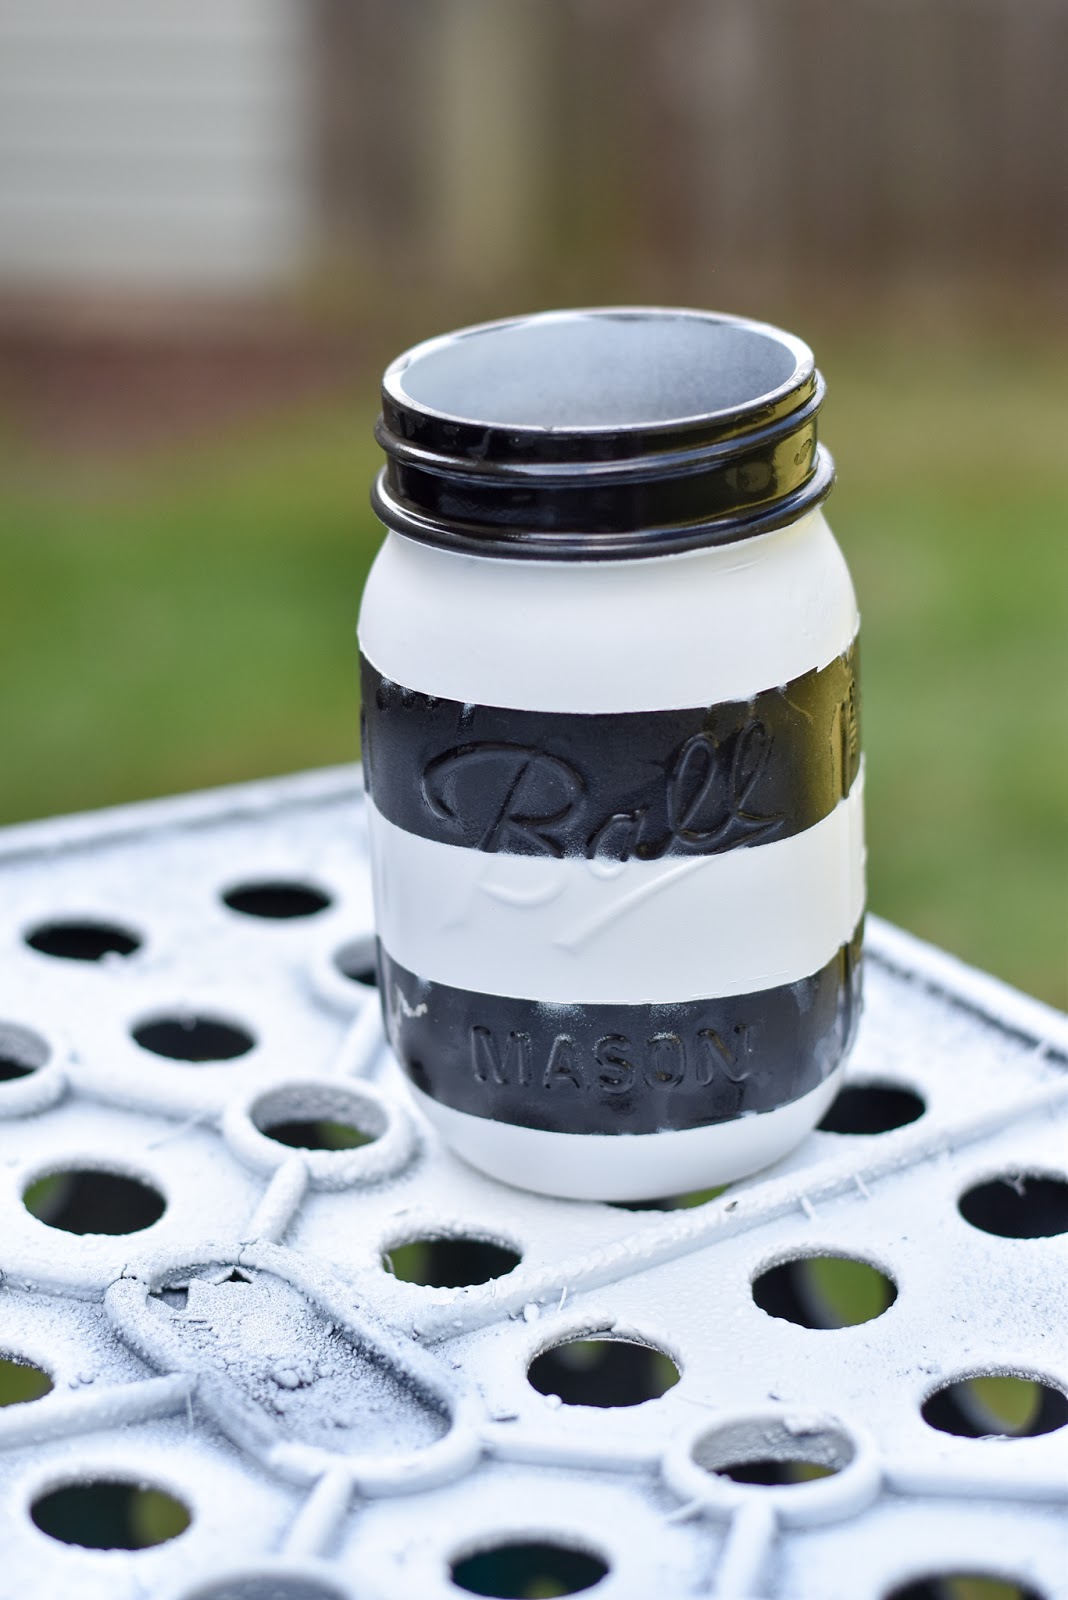
Black and White Stripe Painted Mason Jars

If you follow me on Instagram (and you should!) you will know I have an obsession with Black and White stripes right now.  I just got done painting bold stripes on my family room walls in black and white, buying candles in black and white stripes and now painting mason jars in black and white stripes.  I'd say my obsession is alive and well! 
 I have tons of jars in my house and always keep a collection of spray paint on hand so for me this project was as easy as digging into my stash in the garage and setting up my spray paint station and having at it.  If you don't keep these things around here is what you will need:
2 colors of Spray Paint in the colors of your choice
Mason Jars in the brand of your choice
Painter's Tape
 
First you will want to spray paint the entire jar white.  I did 3 thin coats on my jars to cover them well.  It doesn't have to be perfect since you will be distressing them after but make sure the jar is mostly covered and not see through anymore.  

Once your base coat has dried completely you will need to tape off your stripes.  I didn't do this by measuring because I didn't want them to be perfect but if you prefer perfection more power to you!  My tape measure and I are on the outs after the stripe wall project so I figured imperfection was right up my alley on this project.  

I taped off my stripes by starting right under the rim of the jar and then added a small piece of tape between the stripes to know how far down I wanted to go (just make sure you remove this piece of tape before you start painting your black).  I got three stripes out of my jar using the basic painter's tape.  I know I'm probably not explaining this step very clearly.

Once your lines are taped off go ahead and spray the entire jar black.  Make sure you really seal the tape all around the edges before you start this step.  The above photo is actually after I had already painted the black stripes but didn't seal the tape edges so the black got on my white paint a little.  To fix this I just taped off the black stripes once they were dry and repainted the entire jar white and it worked perfectly to fix the imperfections and bleeds of black.

You can decide if you want your mason jars with or without the "writing" on them.  I wanted mine to have the writing so it created a little more interest but I've painted plenty that do not have the writing and they still look great after they are distressed.  It just depends on your plans for them.
 When everything has dried remove the tape.  I found that letting my paint dry completely before removing the tape worked best.  It is hard for me to be that patient but I made myself do other things so I wouldn't be itching to remove the tape too soon.
 My Charley Girl had to oversee the painting project to make sure I was doing everything right.  She is quite the supervisor!
 Use a very fine grit sandpaper to sand the entire jar.  I went a little heavier over the raised writing but then went softer over the rest of the jar so I didn't actually remove the paint.
 As you can see the distressing masks all the imperfections anyway so don't worry about being perfect for this project.
 If there are areas that didn't get as distressed as you wanted just keep going over them with sandpaper.  I even had some actual chips in my jars but they just ended up adding to the look.  I was worried at first because I figured I'd have to repaint but it worked out in the end and I left the chips.
 I didn't paint lids for this project because I knew I was using my jars for flowers and I had black frog lids already.  If you don't have those or are using them for something else that requires a lid just spray paint it.  
*Frog lids are the wire lids that allow you to arrange flowers.  Sometimes they sell them just as Frog Lid Inserts but the ones I have are the whole lid and they are already black so it's a win win situation!
 I did three vases and added some flowers and a piece of ribbon to compliment the stripes.
Love an easy peasy spray paint project that actually turns out as well as I imagine it will!  
These would be great to fill with candy and give for Halloween Treats to someone special as well!  You could add a very cute Halloween tag and wrap the filled jar in clear cellophane and have fun and unique gift to give to teacher's or coworkers etc.  So many uses for Mason Jars!

Saturday, October 3, 2015

Kielbasa and Cabbage Dinner

Years ago I came across this recipe somewhere and have been making it ever since.  I was doing a low carb diet and basically only eating meat and veggies so this was the perfect meal when I found it.  It can't get any easier than this either which is always nice!  The best part is that the kiddo will eat this and doesn't even bat an eyelash that he is eating cabbage because it has such a good flavor.  It is always nice when he will eat a veggie without fighting me on it.  
You will need:
1 package Kielbasa Sausage
1 red onion
2 bags of cole slaw mix (no dressing!)
1/4 cup of water
Salt
Pepper
Celery seeds (optional)

• Cut the sausage into small pieces and then cut them in half
• Place the cole slaw mix, onions and chopped sausage into a greased casserole dish.  I usually use a 9x13 inch pan but if you were making more or less you can use a different size pan.   
• Drizzle your water over the top of the mixture and then add your salt, pepper and celery seeds if you are using them.
• Bake at 400 degrees for about 30 minutes or until the sausage is browned and the cabbage is soft.
• Serve and enjoy!

When I make mine I do not use celery seeds but just the salt and pepper and sometimes a little garlic.
If you didn't want to use the cole slaw mix just buy a head or two of cabbage and chop it up finely and add that instead. 
 I usually mix mine up while it's baking so that it cooks evenly.
 Now that I'm no longer doing a low card diet I usually serve this with mashed potatoes but you could serve it just as it is and you have a whole meal!
Yummy in the tummy!  So easy and so good which is always a great combo.


Thursday, September 24, 2015

. . . BBQ Chicken Salad and Ramen Noodle Crunchies. . .

It has been a long time since I posted on my blog!  I got out of the habit of doing much of it this summer and haven't gotten back in the swing of things but this salad was good enough that I knew I had to blog about it!  

I get salads at restaurants all the time for my main meal but for some reason I tend to not make them at home that often and I don't know why because they are so simple and very filling!  I make them as a side dish but hardly ever for our main course.  This salad changed that and will for sure have it on repeat!

I know that it looks like there are a lot of ingredients but it's basically just salad toppings.  There is very little to prepare other than your chicken, corn on the cob and the ramen noodle crunchies.  All those things are very easy and can be done in advance and kept in the fridge until you are ready to use them. 
 You will need:
Chicken Breast or Chicken Tenders, frozen or fresh but make sure they are defrosted
BBQ Sauce
Raspberry Vinagarette
1 package Ramen Noodles Chicken Flavor
4 Tbls. Butter
Corn on the cob
Fresh Mushrooms
Frozen Peas
Cucumber
Bacon, chopped
Tomato
Onion 
Hard boiled eggs, chopped
Lettuce
Cheese of your choice
Dressing of your choice
*I highly recommend Sweet Vidalia Onion, Ranch or Raspberry Vinagarette
 To make your Ramen Noodle "croutons":
Break up the dry ramen noodles into fine pieces.  Lay out on a baking dish and sprinkle the seasoning packet over them.  You can also add in some chopped pecans or almonds to this. Cut butter into small pieces and drop around the baking dish.  Bake on 350 for until they are golden brown and crunchy and the butter is all melted.  Stir them up so that all the noodles are coated in the seasoning.  Let cool so you can add them to your salad for a nice crunch and added flavor.  Yummy!
 To make the Chicken:
Mix BBQ Sauce and Raspberry Vinaigrette Dressing together in a bowl.  Pour over your Chicken Breasts/Tenders and let it marinate overnight or all day.  If you don't have time to do that it's ok it will still flavor the chicken when you bake it or grill it.  I don't have exact measurements on the BBQ Sauce and Raspberry Vinaigrette because it would depend on the amount of chicken you are using.  You will want more BBQ Sauce than Vinaigrette.  The Raspberry flavor is just to add a zing so don't overwhelm it with a large amount of dressing.  

Put the chicken in a baking dish and cover with your sauce from the marinade.  Bake the chicken on 400 until it is cooked through.  You can also grill the chicken which adds to the flavor.  Brush the sauce on it as you grill to keep it moist and flavorful.

Prepare your corn on the cob as you normally would--microwave, grill or stovetop in boiling water.  Once it is cooked through let it cool so you can take the corn off the cob without burning yourself. 

Defrost your frozen peas in a bowl of cold water.  Chop all your other veggies to prepare for the salad.  Crumble your bacon.
 To make the salad:
Place the lettuce in bowls and then add all of your toppings.  For ours  I just put all the toppings in bowls and let everyone create their own salad.  Top with Sweet Vidalia Onion Dressing or Raspberry Vinaigrette.  You could also use Ranch or even Honey Mustard but I can only speak for the first two because that is what we have used on ours.  I buy the Ken's Brand for most of our dressings. 
Dig in and enjoy this delicious salad!  I was shocked that even our son gobbles this salad up and he says he doesn't like salad so that is saying something!


Sunday, August 9, 2015

Impossibly Easy Peach Pie from Grandma

This is a recipe I posted a couple years ago but I have updated it and thought I'd re-share because honestly it's too good not to!

It's hard to believe that summer is soon coming to an end but while it is still hot and steamy this is a fantastic dessert to use up those great summer peaches you probably have around!  This pie is from my grandmother and it's so simple to make!  She calls it Crumbly Peach Pie but after making it I changed that up a bit and named it "Impossibly Easy Peach Pie" because for years when she made it I always assumed it was a difficult one to make because of the amazing flavor but...nope, it's easy as "pie"!  I am guaranteeing you will enjoy this pie!


Impossibly Easy Peach Pie
Pie Crust:
2 Cups All-Purpose Flour
¾ Cup Crisco
1 tsp. Salt
3T. Ice Water
Cut shortening into flour with a pastry blender very thoroughly.  Add 3 Tablespoons ice water and mix with a fork into a large ball of dough.  Divide into 2 balls, wrap in wax paper and place in the refrigerator for about 30 minutes before rolling for crust.  Once crust is rolled out place in a pie plate.  Bake for 10 minutes on 450 degrees weighting the crust with pie weights or forks.  Remove from oven and let cool for a few minutes before filling.

Peach Pie:
1 Cup Sugar
½ Cup Flour
⅛ tsp. Nutmeg
Mix the above ingredients and cut in ½ Cup Cold Butter until crumbly.  Sprinkle half the crumbs in the bottom of your prepared crust.  Peel and cut 3 to 4 large peaches in half.  Fresh peaches are best in this recipe.  Place the peaches cut side down on the crumbs then cover with the remaining crumb mixture.  Sprinkle with 2 to 3 tablespoons of water and bake in a 450 degree oven for 10 minutes then reduce the heat to 350 degrees and bake for about 30 minutes.  Cool and serve with ice cream or cool whip.
• Gather your ingredients for the pie crust and the peach pie
• Prepare pie crust by cutting the Crisco into the salt and flour mixture then add ice water and form into a large dough ball.  Place in refrigerator for about 30 minutes before rolling it out
• Place your dough onto a pastry cloth or floured surface and roll out to fit a 9 inch pie plate
• Place rolled dough into a pie plate and flute the edges.  Weight the crust with pie weights or forks and bake at 450 degrees for 10 minutes.  Remove to cool before filling

• Combine the sugar, flour and nutmeg together in a large bowl
• Cut cold butter into the flour mixture until you have blended it well and you have "crumbs"
• Peel and slice peaches in half
• Cover the entire crust with crumbs, reserving some for the topping

• Place peaches cut side down on top of the crumbs then use the remaining crumbs to top the rest of the peaches.  Add 2 to 3 tablespoons of water and bake as recipe instructs

 Easy as PIE!
 Yummy in the tummy!
Recently someone tried this pie for the first time and he said it was so good that when he died he wanted it buried with him.  Now that is a rave AND unique review if I have ever heard one!

Satisfaction guaranteed!

Saturday, June 27, 2015

. . . Family Room Tour . . .

I don't think I've ever done a room tour on my blog but our family room is my favorite room in the house so I thought I'd share!  I wanted it to be very colorful because I knew it would be where we spent most of our time and when I think of color I think of fun!  We never use our living room so this is the central gathering spot where we all spend our time.  The walls haven't changed color in a long time but we've recently updated the carpet and furniture and some of the decor.  I'm always changing something or I get bored.

I love that this room is so open and bright with the morning light coming in the windows!  
 
The artwork on the walls is one of my favorite things and came from Target years ago.

 This bowling pin was a thrift store find that I'm obsessed with.  I passed it up a couple times thinking it was probably a silly purchase but couldn't get it out of my head.  I went back to the shop a third time and it was still there so I figured it must be a sign that it was meant to be mine!  My dad saw it and just loved it so I got one for him for Father's Day and he couldn't be happier!

When we moved into our house this 2 story family room really intimidated me because I had no idea how to fill the wall space without spending a fortune on huge artwork.  That was before Pinterest became popular so it was a challenge I had to work on without the help of my favorite addiction.  How did we survive without Pinterest?  I found a couple cool plates and picked them up and then when we finished painting the idea came to me and I started hitting the clearance sales, garage sales and even gathering a few from my grandmother's basement.  I had these shelves from when I was a kid and just painted them to coordinate with the room and then my mom and I spent hours laying out the design and hanging the plates.  It was a great way to decorate this big wall on a budget but still bring in a lot of color.  These plates have received many compliments over the years and still remain something I love about this room.
 
There is something I just love about blue and yellow so it only seems right that I would pick out blue furniture.  This is from La-Z-Boy and we have been very pleased with it and how well it cleans up.  The colorful throw pillows were made by my mom and the quilt was made by my grandmother.

 This chest needs painted again but this was a curbside find which my son and husband are appalled by but we sure have gotten serious use out of it.  Inside we keep tons of video games and game accessories so it isn't right out in the open.  The pepsi crate I picked up at a flea market after begging the man to sell it to me.  He was using it as a display but I loved it and wasn't taking no for an answer so finally I wore him down.  I have made it into a charging station of sorts because of the open slats at the bottom.  I just run our cords up through the slats and plug in our devices.  It also serves as storage for my son's stuff.


This little table was another thrift store find.  I think I'm going to paint it but I haven't decided on what color so for now it is staying white.  
 
The window treatments were made by my grandmother and I.  I can't get enough of circles so when I saw that fabric I knew it would be perfect for this colorful room.

Don't mind the outlet in this photo other than to know it's a USB outlet we recently put in several of the rooms of our house and we are completely obsessed with them!  Easy to do and they work great for just plugging in your devices and still have 2 outlets free.

To add some more pops of color I painted blocks of color on two of the walls as you can see here.  Clearly I should have straightened up those candles that are in the stars.  Just pretend you didn't notice how crooked they are.
 
My husband works in aviation so when my mom found these airplane book ends she immediately bought them for him.  They don't have any books in them now but they go well with the transportation artwork above the fireplace.

This is my favorite little corner.  I curl up in the corner of the loveseat and watch tv or read and everyone knows that is mom's spot.  Maggie thought she needed in the picture too and who am I to say no to her?

These lamps were a recent find at Target.  I had been wanting to brighten up the lamps in this room but just hadn't found the right look so when I was cruising Target I found these and knew they were perfect.  It took 4 Target stores to finally get both of them but it was worth the running around trying to find them.

This small wall is at the bottom of our steps and divides up the kitchen and dining room from the family room.  I picked up the plates at Target, the Love artwork from Christmas Tree Shop and the Flower artwork from Hobby Lobby.
 
This ottoman opens up for storage and we keep extra pillows and blankets in it for sleepovers my son has.  It also serves as Charley's favorite spot to hang out when we are in here.

These lanterns are from a local gift shop and have my favorite flameless candle in them...Luminara.  They look so incredibly real!  If you haven't seen them or tried them you should.
 
The wooden crate in the corner is from La-Z-Boy and stores blankets in it.  The candle holders are from a flea market and I painted them white to make them pop.

Thanks for stopping by!  Now I'm off to curl up in my favorite spot to read a book on this rainy day.