Showing posts with label spray paint. Show all posts

Tuesday, January 3, 2017

Faux Reindeer Antler DIY

I love that antlers are making such a big appearance in decorating but I'm not a fan of the idea of a real antler sitting around.  I know I might be odd but I just am not feeling having a body part of a live animal sitting in my house. I know that deer don't have to be harmed to get their antlers but it just creeps me out...call me strange.  I do however love the look antlers give to your decor so when I ran across these silver metallic floral pick antlers at Michael's I knew I had a craft project.  I picked these up before the holidays for around a dollar each so you really can't beat that!  With the popularity of antlers I would imagine that the craft stores will continue to carry some form of antler in floral department.
As you can see it's a pretty antler even in the silver but it's not the look I wanted.  
This was the look I was going for so that it'd look a bit more realistic so out came the spray paint and wood stain.  First I used pliers to remove the floral pick by tugging it out.  It was very easy to remove but if you can't get it off you could also cut it off right at the base of the antler.  It does leave a tiny hole so if you wanted to fill that just use a little filler there.  I didn't bother because I knew my antler would be displayed with things around it and you'd never see it anyway.
To achieve the look of a real antler I used Rustoleum Heirloom White spray paint.  This is a gorgeous off white and works well for so many projects.  I didn't cover the antler entirely so that some of the silver color still showed through a tiny bit.  It's really trial and error.  I have done at least 5 of these now and every one of them turns out slightly different which I love so just play around with the coverage.  Once the spray paint is covering your antler on all sides and it's dry you will now need to use some wood stain.
For my wood stain I used Minwax Espresso and Classic Gray.  Always make sure to shake the Classic Gray stain because all the pigment sinks to the bottom and without shaking it you will get little to no coverage.  I used an old tshirt and dipped it into the Espresso stain and quickly wiped it all over the antler.  I then wiped the bulk of it right back off.  I worked quickly so the stain wouldn't get too dark but if you don't work fast and need to redo it just add another layer of spray paint and try again.  Once the Espresso stain is wiped off I then did the same thing with the Classic Gray.  After I wiped the gray back off I then took my Espresso and dabbed it onto some of the raised areas of the antler so it would have tiny bits of dark spots and did a few areas in the Classic Gray stain as well.  I let it dry and that was it.
 I know it may not be a perfect match to a real antler but I was certainly pleased with how it turned out.  So pleased that I went on to make some for my mom and more for myself.  I loved that each one turned out differently so they are unique.
Even though these photos are from Christmas I will continue to use the antlers in my decorating long after the holidays. I hope you will take a chance and give this a try if you like the look of antlers in your decor.

Wednesday, November 25, 2015

Copycat Crate & Barrel Ho Ho Ho Letters

I just love this time of year!  Everything is so festive and happy.  Of course there is the flip side of that too which means this time of year is exhausting, stressful, hectic, and more!  But mostly I love it.

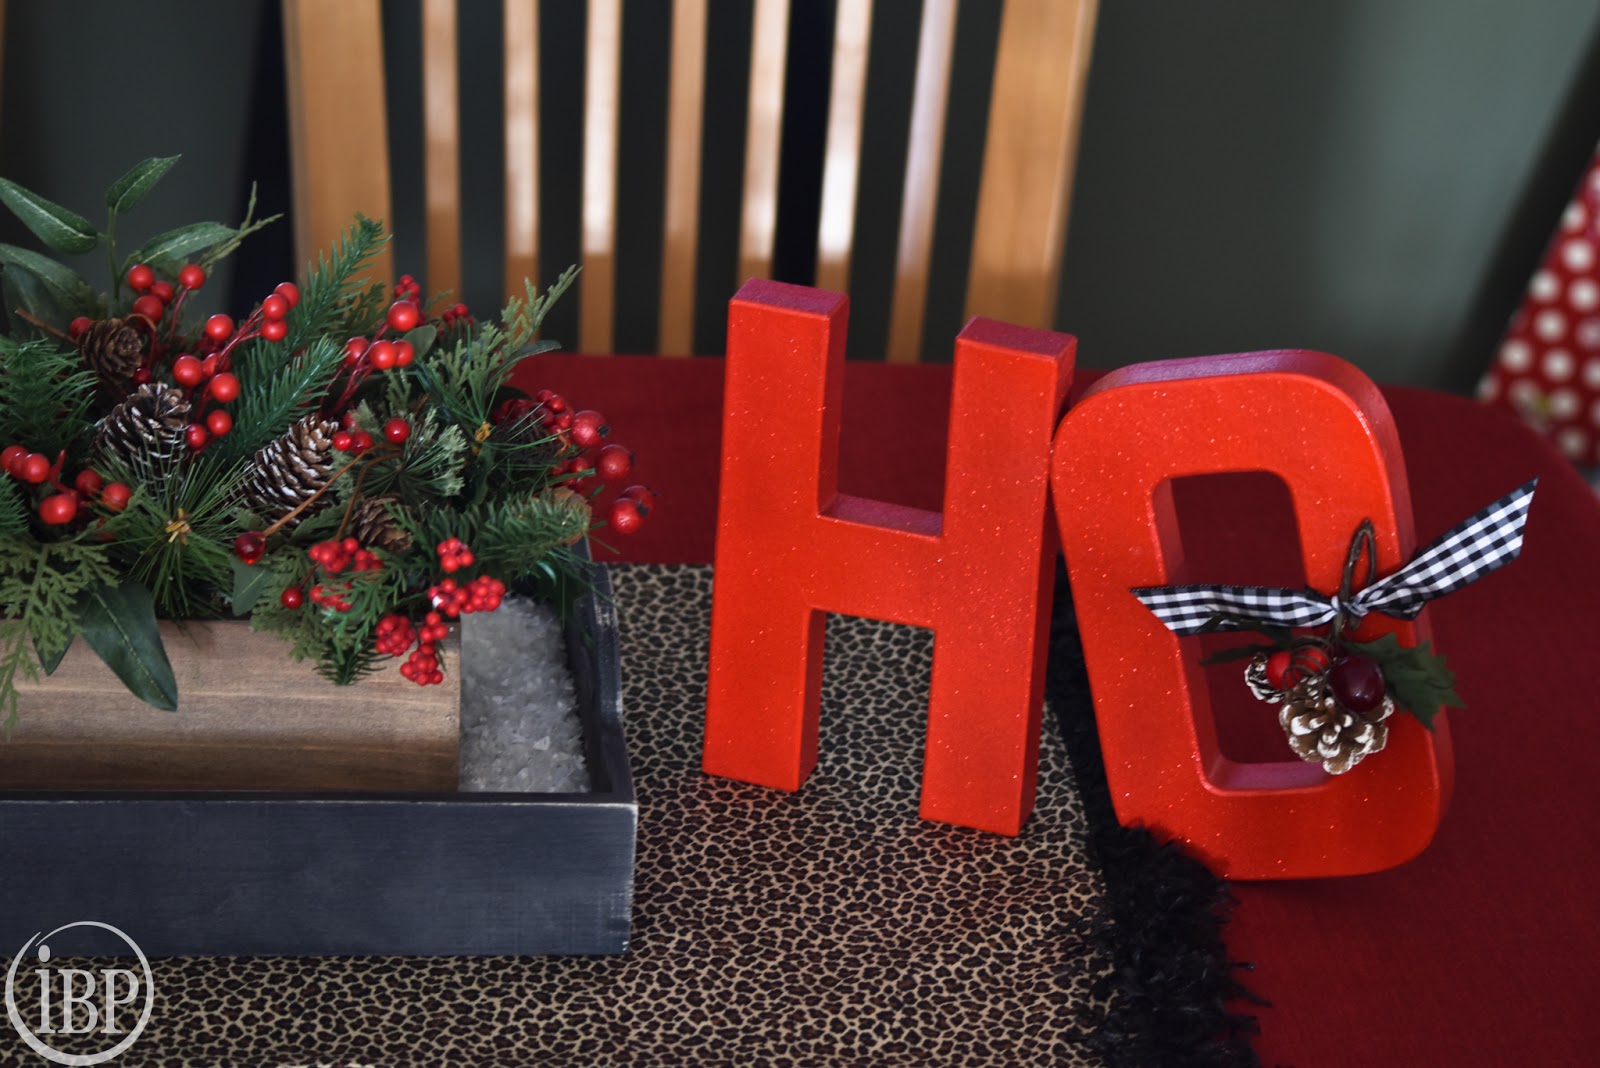
I was perusing Crate & Barrel recently and saw these metal Ho Ho Ho letters and just loved them.  I am always looking for a project so I immediately thought about how I could remake them myself on the cheap.  I remembered I had a few paper mache letters at home and decided to try spray painting them to see if they would hold up.  It worked like a charm so I got more letters and sprayed them all with high gloss red paint and then did a final coat of red glitter spray paint over the letters.  Easy as can be right!?
 You will need:
H's and O's in wood or paper mache 
High Gloss red spray paint
Red Glitter spray paint
If you want your O tipped like mine then you will need E6000 adhesive
Ribbon
Sprig of berries or something similar 
  I sprayed all my letters on all sides letting them dry entirely before adding a coat of glitter spray paint in red.  I used a very light coat of the glitter just so it had a tiny bit of sparkle. 
 Once they were dry I angled the O in the direction I wanted it to be and added E6000 glue to the spot where the O touches the H and then added a piece of wire around the two letters to hold them together until they dried. 
 After the glue dried I then cut a piece of grosgrain ribbon and added a little sprig of berries and pine cones.  
I also remade this centerpiece from Target by adding quite a few pine cones and sprigs of pine and berries to spruce it up.  I got it on clearance last year but it looked sparse to me so it was an easy fix!
 I probably should have Ho Ho Ho out but I just used 2 sets on either side of my centerpiece and I'm very happy with them.
An easy and inexpensive craft to make which is my favorite kind!

Saturday, October 10, 2015

Black and White Stripe Painted Mason Jars

If you follow me on Instagram (and you should!) you will know I have an obsession with Black and White stripes right now.  I just got done painting bold stripes on my family room walls in black and white, buying candles in black and white stripes and now painting mason jars in black and white stripes.  I'd say my obsession is alive and well! 
 I have tons of jars in my house and always keep a collection of spray paint on hand so for me this project was as easy as digging into my stash in the garage and setting up my spray paint station and having at it.  If you don't keep these things around here is what you will need:
2 colors of Spray Paint in the colors of your choice
Mason Jars in the brand of your choice
Painter's Tape
 
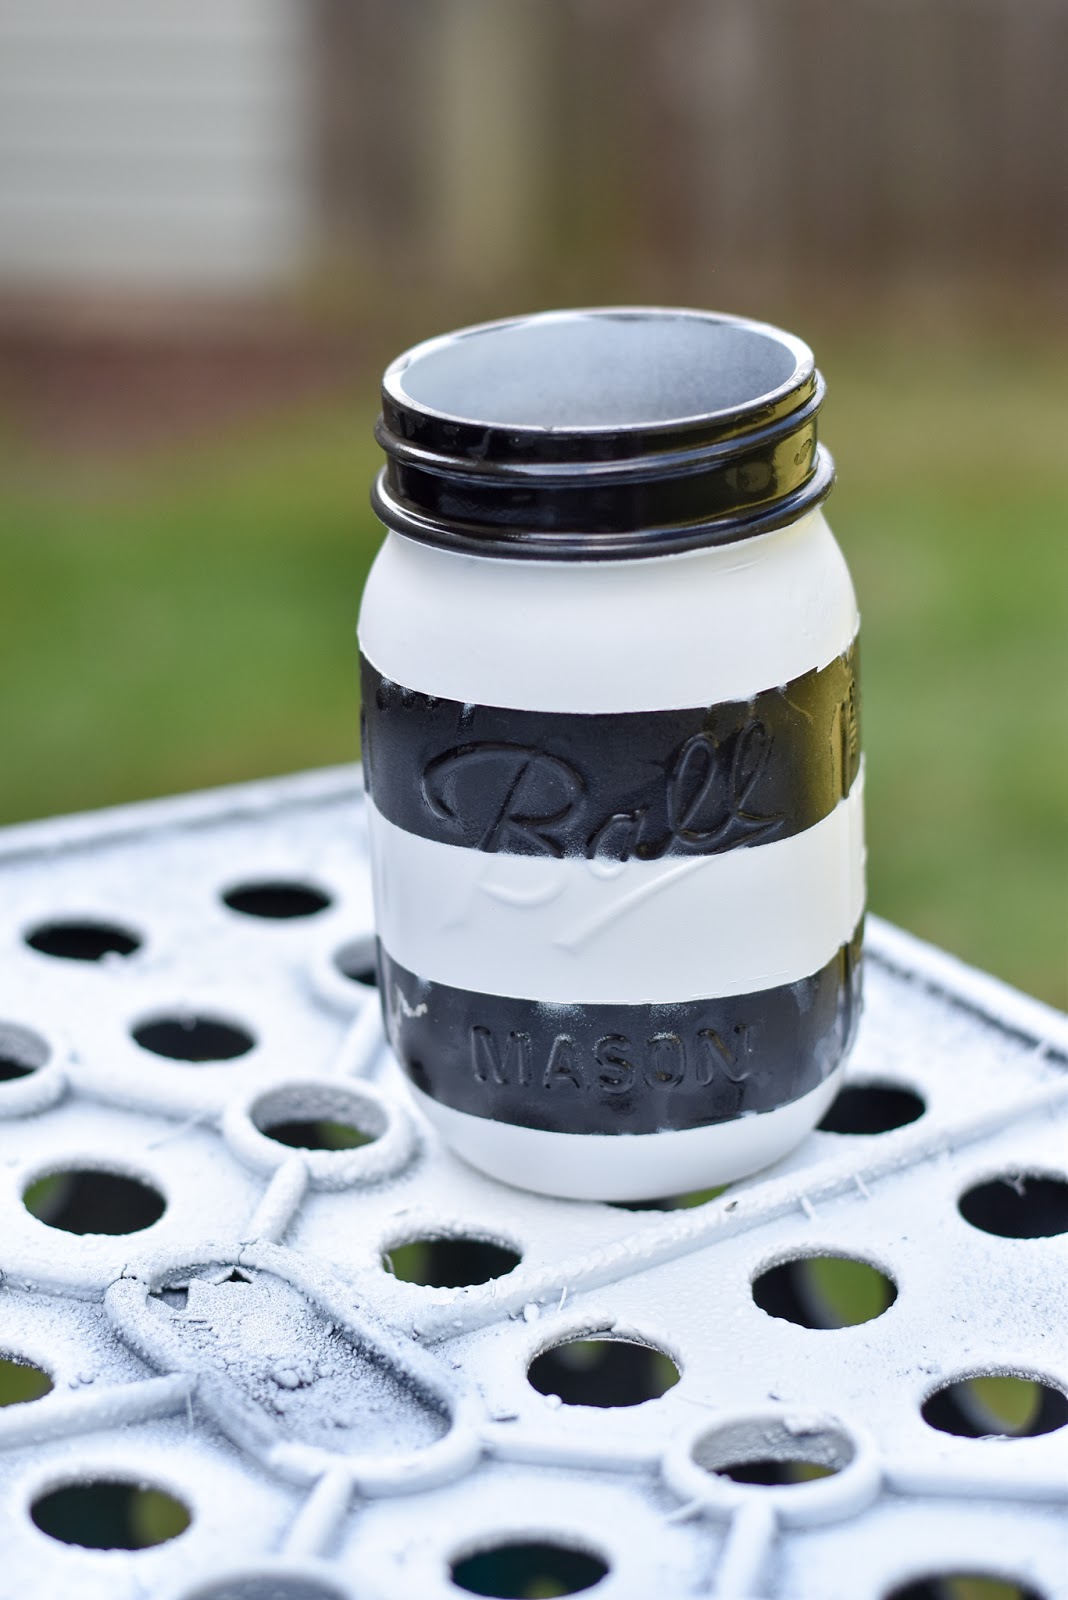
First you will want to spray paint the entire jar white.  I did 3 thin coats on my jars to cover them well.  It doesn't have to be perfect since you will be distressing them after but make sure the jar is mostly covered and not see through anymore.  

Once your base coat has dried completely you will need to tape off your stripes.  I didn't do this by measuring because I didn't want them to be perfect but if you prefer perfection more power to you!  My tape measure and I are on the outs after the stripe wall project so I figured imperfection was right up my alley on this project.  

I taped off my stripes by starting right under the rim of the jar and then added a small piece of tape between the stripes to know how far down I wanted to go (just make sure you remove this piece of tape before you start painting your black).  I got three stripes out of my jar using the basic painter's tape.  I know I'm probably not explaining this step very clearly.

Once your lines are taped off go ahead and spray the entire jar black.  Make sure you really seal the tape all around the edges before you start this step.  The above photo is actually after I had already painted the black stripes but didn't seal the tape edges so the black got on my white paint a little.  To fix this I just taped off the black stripes once they were dry and repainted the entire jar white and it worked perfectly to fix the imperfections and bleeds of black.

You can decide if you want your mason jars with or without the "writing" on them.  I wanted mine to have the writing so it created a little more interest but I've painted plenty that do not have the writing and they still look great after they are distressed.  It just depends on your plans for them.
 When everything has dried remove the tape.  I found that letting my paint dry completely before removing the tape worked best.  It is hard for me to be that patient but I made myself do other things so I wouldn't be itching to remove the tape too soon.
 My Charley Girl had to oversee the painting project to make sure I was doing everything right.  She is quite the supervisor!
 Use a very fine grit sandpaper to sand the entire jar.  I went a little heavier over the raised writing but then went softer over the rest of the jar so I didn't actually remove the paint.
 As you can see the distressing masks all the imperfections anyway so don't worry about being perfect for this project.
 If there are areas that didn't get as distressed as you wanted just keep going over them with sandpaper.  I even had some actual chips in my jars but they just ended up adding to the look.  I was worried at first because I figured I'd have to repaint but it worked out in the end and I left the chips.
 I didn't paint lids for this project because I knew I was using my jars for flowers and I had black frog lids already.  If you don't have those or are using them for something else that requires a lid just spray paint it.  
*Frog lids are the wire lids that allow you to arrange flowers.  Sometimes they sell them just as Frog Lid Inserts but the ones I have are the whole lid and they are already black so it's a win win situation!
 I did three vases and added some flowers and a piece of ribbon to compliment the stripes.
Love an easy peasy spray paint project that actually turns out as well as I imagine it will!  
These would be great to fill with candy and give for Halloween Treats to someone special as well!  You could add a very cute Halloween tag and wrap the filled jar in clear cellophane and have fun and unique gift to give to teacher's or coworkers etc.  So many uses for Mason Jars!

Wednesday, August 13, 2014

Bread Box Makeover with Krylon Spray Paint

My grandmother has always wanted a bread box for the kitchen to store bread and crackers and other goodies.  My mom and I went thrifting when we were vacationing at Ocean Isle Beach this summer and we found this bread box that had a nice little divided drawer and a big storage space for breads.  We both knew we had found a keeper for my grandmother.  She of course was thrilled with the bread box when she saw it but wanted it painted and updated.  That is where I came in...I bought some black Krylon Spray paint (my favorite spray paint!) and went to Hobby Lobby and got an awesome knob that really adds a nice pop to the front of the drawer. 

I didn't get a before photo of the wheat engraving but my mom spent a lot of time taking a nail and etching it out because it wasn't deep at all and wasn't really that noticeable and it happened to be one of my grandma's favorite things about the box.  She got it much more pronounced and adding the paint made it pop out and be more apparent from a distance.

The completed Bread Box is now a center piece of the kitchen and she loves it!

 I really sanded the box well and removed the cover to make painting it easier.  I used Krylon Satin Black spray paint and it worked perfectly for this project and left a beautiful shine but not too shiny.

 As you can see my mom really etched that wheat design to make it deeper and more noticeable and it now really pops!  It was worth the time it took her to do that because it made a bigger impact on the finished product.

After sanding the entire box I was ready to start painting.  It took several coats but they were thin coats.  I used 3 cans of Spray Paint on this box.

 Hobby Lobby has the best knobs and all very reasonably priced!  I headed over there and took the drawer with me to make sure the knob I chose would work perfectly.  This one was a keeper!  I just love that it's already antiqued and has black showing through to match the black bread box.

It is now perfect to store bread, crackers, cookies, etc.  She loves it and that is what counts.  I love doing projects like this that make others happy!

 As you can see the wheat design really pops now and you can see it across the room.
 
 Love it!
 
 Another fun makeover project!

Monday, July 28, 2014

Simple Painted Wine Bottle Framed Centerpiece

I was cleaning the house this past weekend and really needed an updated centerpiece for the dining room table.  I can't stand to have the table sitting empty and I was bored with my previous centerpiece so I rooted around in the garage where I keep all my extra decorating items and found the painted wine bottles I use for a variety of things and these great frames I had from Micheal's that were just 5 bucks. A light bulb went off and I thought I'd make a framed centerpiece with the wine bottles.  So out came the spray paint and ran out to the yard to put a quick coat of ivory paint on the frame and then sanded some of the paint off to give it an older look.

So simple and quick to do!
 I used Krylon Almond in satin finish for the frame and then sanded it down after it was dry.  I also gathered up a few twigs that were in my yard from a recent storm and lightly coated them with a little white spray paint so they weren't just a drab gray color.  I wanted to use them for filler and this coat of paint helped brighten them up a little bit.

 I placed the frame on the table and then centered the bottles and added the painted twigs and was done.  Can't get easier than that!

 Who knew?  A little paint on the twigs snazzed them right up.

 These frames were such a bargain at 5 dollars and are super easy to paint any color.  Because the base color was black it was perfect for sanding some of the color off to give it an old feeling.

 I used a sanding block to sand off some of the paint on the details of the frame and some of the edges.  I love doing this to painted items to make them look a little worn.
Perfect for the dining room table!

Monday, April 30, 2012

. . . DIY Painted Knife Block . . .


I love my kitchen knives!  They are Wusthof Classic Ikon Crème and they are one of my favorite things in my kitchen.  The only drawback to these knives is the standard knife block that came with them.  Not so pretty!  Well, I decided it was time to give that ugly knife block a good coat of paint and dress it up a little. 

My kitchen walls are a plum purple and the accessories are purple and chartreuse.  Well, why not make the knife block match everything?  Yep, that is what I did.  I can promise you from experience that you will get a boatload of compliments on your Knife Block Makeover.  I hosted a party recently and probably could have taken orders from people wanting me to do theirs too.  Such a simple project that is a real head turner.

I used Ivy Leaf Gloss Spray Paint from Krylon, E6000 Glue, a wood medallion from the craft store and a great drawer knob from Hobby Lobby that tied it all in.

I do not use the steak knife slots in my block so it didn't bother me that the medallion covered up two of them.  This block has the Wusthof name on the front and I had to have a quick and easy way to cover it up or fill it in with wood filler.  I chose the decorative way since I don't care about those slots.  Even if the slots are something you use there is still space for 4 of them or you could use a smaller wood accent that still covered the brand name.

••• Bold!
 
• Gather your supplies--sanding block, knife block, primer, spray paint, glue, wood medallion and drawer knob
• Place the medallion or decorative accent of your choice where you want it on the block
• Cover the entire back of the decoration with E6000 Glue and apply the wood piece where you want it.  Let it dry completely before painting 

 • Use a good spray paint primer to cover the wood decoration and the knife block
• It is worth doing the primer step even though it's tempting to skip over it
• Once the primer has dried apply several thin coats of the spray paint of your choice.  As mentioned above I used Krylon Ivy Leaf in Gloss.  I love the shiny look to the finished block but you may prefer the satin finish.

 • Once the painted block is completely dry you will be ready to add the drawer knob in the center of your wooden decorative piece
• This knob had a screw attached but I used plyers and my brute strength and pulled it out. 
• Cover the back of the knob with E6000 Glue and place right in the center of the wooden medallion
• Stand the knife block upright so the knob doesn't slide.  Let the glue dry completely before use.

• I would recommend sealing it with a clear polyurethane spray in the same finish as your paint (gloss or satin).  

 ••• Bright!
 ••• Fun!
 ••• Love it!
••• Pretty!
••• Linking Here:  
Polly Want a Crafter

Monday, September 5, 2011

. . . Oil Rubbed Bronze Drawer Pulls . . .

As you know, I am a bit obsessed with ORB spray paint--it's a sickness really. 

I am working on updating a bedroom in our house and decided to take my son's old dresser with brightly colored drawer pulls and make it a bit more grown up looking by spraying the wooden drawer pulls with some ORB spray paint.  It was just enough to dress it up a bit.  

 • • • • • • • • • • • • •

 The one thing I have learned with spray paint is how important it is to make sure you use a primer.  The third photo shows the gray primer I use prior to spraying the ORB.  The flat primer really helps eliminate bubbles when you paint the color you are using for your project.  I know that if you don't have a true spray primer you can use any color matte spray paint.

 An improvement for sure...