If you aren't following Paper, Paint and Pine on Instagram you should! You can also visit the Shop for paper goods and some handmade wooden items like Key to Decor Beads?
I was not financially compensated for this post. I received a sample for review purposes. The opinions are completely my own based on my experience.
I don't know if you've heard but I have a new niece. She's 4 months old and it's her first Easter! I am looking forward to having a basket for her filled with cute girly things however I needed a cute basket first. I searched Pottery Barn Kids and they were cute but didn't wow me so I decided to go the inexpensive route and make my own. Two of my favorite things...budget friendly and a craft!
Have you guys heard of HTV World? They are a shop that specializes in all kinds of Heat Transfer Vinyl! Here is what they say about their shop:
"If you’re looking for some of the best heat transfer vinyl on the market you’ve come to the right place. We carry Siser heat transfer vinyl.
Heat Transfer Vinyl World let’s you shop your way. By COLOR. Choose your base color and see hand-picked accent colors that complement any color for any project. Never get stumped again and find colors that work for you.
HTV World is dedicated to making your shopping experience a breeze."
They have such an easy way to shop because every color gives you several coordinating colors and styles of heat transfer that will go with your pick. I loved shopping with them and they have a great assortment of styles and the quality is top notch!
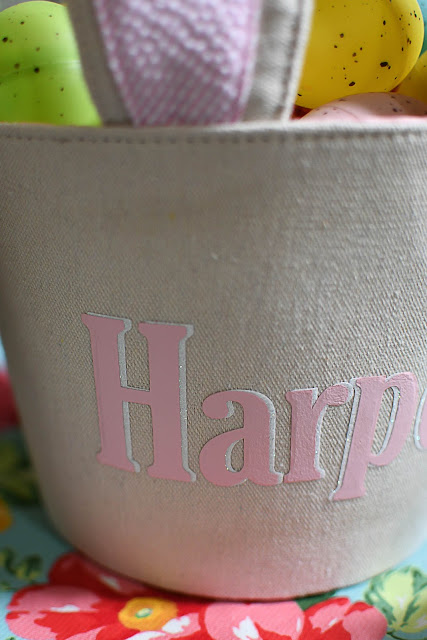
I found my cute little bunny basket at Target in their dollar section for and knew I had to do something to make it just a bit cuter so I went straight to HTV World and snagged some colors that would work perfectly for her basket. I went with pale pink, white glitter and solid white but didn't end up using the solid white for this project so I'm sure you will see another post down the line where I use it.
I used my Silhouette machine to create the decal using just her first name and then mirrored the image and cut it out of the pale pink and then the glitter white.
Once my HTV was cut I did the weeding (taking off excess material around the letters) and prepared my iron to get it ironed on. I dumped the water out of my iron so there wouldn't be any steam and set it to the linen setting and let it get good and hot.
I then placed my decal using the glitter htv first and due to it being a curved surface I did cut the word in half to make it a little straighter.
I placed my basket over the end of my iron so I had a surface to press the basket and decal on.
I then placed a thin piece of fabric over the decal to protect it from melting onto my iron. I just use a tshirt and just use one layer of it and it works great.
Once the tshirt was covering it I placed my hot iron on it without moving it too much so it wouldn't move the htv. Once I knew it was secured enough to the basket surface I started slowly moving my iron over it while applying pressure and then once the backing was coming off the vinyl I slowly removed it and had an adorable basket!
After I did the glitter layer I then placed the pale pink layer over top of it but moved it just slightly over so the white glitter would just peak out. Most people would probably put the smooth vinyl down first and then do the glitter but I wanted the glitter to just be an accent.
How easy is that? So simple but creates the cutest little basket for so cheap!
Isn't it so cute? I just love that little accent of glitter sticking out!
Moral of the story? Go visit HTV World for your heat transfer projects!
Happy Easter!


