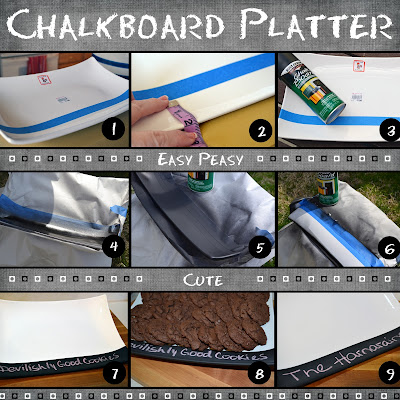
The other day I posted Cookie Time Tuesday and my cookies were photographed on a cool Chalkboard Platter I made. I promised a tutorial so here you go...this was super easy and works like a charm!
I recently saw another blogger do Charger Plates that were painted in chalkboard paint and each person's name was printed on the rim so it was a decorative item and a seat marker all in one. Think of how cool a party would be with the Charger Plates and Serving Platters with the rims painted in chalkboard paint so you could write the name of each dish on them. Fun!
1. Buy your platter. Something with a straighter edge is going to be best versus a round plate. I would sand the plate in the space you are painting with a low grit sandpaper to take off some of the shiny finish.
2. Tape off about 2 inches or the width of your choice depending on the amount of Chalkboard space you want.
3. Grab your Chalkboard Spray Paint and get to work
4. Make sure you cover the rest of the plate with paper or plastic so paint doesn't get all over the plate. Luckily for me the paint wiped right off this plate because I did have a little on it when I removed the paper.
5. You can see after just a couple quick coats the chalkboard finish is setting up
6. I flipped my plate over and sprayed the back side as well. Again I measured 2 inches in and taped it off. This step wasn't a must but it looks better with the type of plate I used because you can see under the lip when it's sitting on the table.
7. Let it dry and start using it to serve
8. I added my cookies and wrote the name of them on the rim of the plate
9. When not using it print your family name or something cute on it.
**For washing you will want to only wipe the chalkboard area with a damp cloth so the finish doesn't wear off. I just used a wet, soapy cloth and wiped the platter avoiding the chalkboard area. I then wiped down the chalkboard area with a slightly damp cloth but no soap.
Linking Here:







So cute! I love it. This will definitely go on my list of things I must have.
ReplyDeleteI love so many of the chalkboard projects, but I was in Michaels last night at the Chalkboard spray was something like $7.50. Seems a bit steep!
ReplyDeleteSuch a fun idea!!
ReplyDeleteThat is so cute--what a great idea!
ReplyDeleteRachel @ Maybe Matilda
I'm loving all the chalk board paint tutorials lately. Cute blog!! --Connie, measuredbytheheart.blogspot.com
ReplyDeleteLove it! I might have to try that....
ReplyDeleteI love that idea, so cute!
ReplyDeletethis is a great idea. so cute. I'd love to find some inexpensive chargers and try that too.
ReplyDeletemegan
craftycpa.blogspot.com
I love it!! What a neat twist on chalkboard paint. I've seen platters painted before, but never just the edge for writing on. Fun!
ReplyDeleteThanks for joining my Weekend Bloggy Reading party. :) Hope you'll stop by Serenity Now again soon!
Great idea...really fun for parties :) laurel
ReplyDeleteI like how your platter turned out! I've never tried the chalkboard paint, only the spray paint...thanks for linking to my linky party - please stop by again and how more projects! Have a great weekend!
ReplyDeleteThanks for the how-to, what a great idea! I am going to find a platter and do this. It would be perfect for platters and ideal for those church carry in dishes!!
ReplyDelete