Tuesday, February 26, 2013

. . . Cookie Time Tuesday -- Cool Whip Cake Mix Cookies . . .

We all know that Cake Mix in cookies makes them so moist and delicious but who knew adding Cool Whip to a cookie recipe would make such an amazing cookie!  I have seen this recipe idea floating around the web and Pinterest for ages but just have never made them and I regret that now because they are amazing!  I love that you can easily change the flavors and color just by changing up your cake mix flavor!

Recently I was in Walmart and they had a big display of spring flavored cake mixes--Orangesicle, Key Lime and Pink Lemonade.  I picked them up to keep on hand for when I was inspired to make something yummy with them and thank goodness I did because they made great flavors for these cookies!!


1 Cake Mix--flavor of your choice
2 Eggs
8 Ounces Cool Whip, thawed
Powdered sugar for coating the cookies before baking

Mix your eggs and cool whip with an electric mixer until fluffy.  Then add in your cake mix and combine well.  The dough will be very sticky and thick but this is what you want.  Cover and chill dough for at least 30 minutes or longer.  Once you are ready to make the cookies preheat the oven to 350 degrees.  Line your baking sheets with parchment paper or a silpat mat.  Scoop dough by spoonfuls and drop into a bowl of powdered sugar and roll dough so it's evenly covered with the powdered sugar.  Place dough onto your baking sheet spaced about 2 inches apart.  Bake for 9 to 11 minutes.  Remove from oven and cool on baking sheet for a few minutes then move to a cooling rack.  Eat and enjoy!  

A few tips:
After making these cookies I realized the longer they chilled the better the dough was to handle because it's very sticky.  Also I think the cookies are better kept in the fridge after they are baked because mine got a bit soggy looking being kept at room temp. 

I made two flavors--Key Lime and Orangesicle.  Yum!  I think next time I make these I will add a little orange zest to the Orangesicle and a little lime zest to the Key Lime.  I think it will just enhance the flavor but you wouldn't have to do this step. 

 • Gather ingredients
• Mix cool whip and eggs until well combined
• Add cake mix to the cool whip mixture and mix well with your electric mixer.  Place in fridge to chill for at least 30 minutes.
• Scoop dough by spoonfuls and drop into a bowl of powdered sugar and cover the cookie dough completely with the powdered sugar then place on a baking sheet about 2 inches apart.

• Bake for 9 to 11 minutes in a 350 degree oven then remove to a cooling rack until cookies have cooled completely

Yummy!!

Springy!
Enjoy!

Friday, February 22, 2013

. . . Easy Homemade Ice Cream . . .

Ice Cream!  Ice Cream!  
We all SCREAM for ICE CREAM!!

Growing up one of my favorite memories was making homemade ice cream at our birthday parties.  We had a hand crank maker and all of the kids took turns cranking it and then when it was done we were all fighting over who would get to it first.  There just doesn't seem to be anything that tastes as good as real homemade ice cream but it's a lot of work if you have the hand crank machine.  I now have an electric machine but it's still messy and takes up a lot of time so we don't make homemade ice cream all that often.  Until now!!  This recipe will blow your mind and it can't be any easier!  Another added bonus is that you can make a million different flavors.  It's literally a two ingredient recipe and then you decide on what mix ins you want to add.  The possibilities are endless!
 
 
 2 Cups Heavy Whipping Cream
+
1 Can Sweetened Condensed Milk
+
Mix Ins of your choice 
Beat heavy cream with an electric mixer until stiff peaks form.  Mine took about 5 minutes.  You want to make sure the heavy cream is chilled and not at room temp.  I even chill my bowl when I am beating heavy cream because the cold just helps it set up.  Once the heavy cream is beaten until stiff then add the sweetened condensed milk and stir by hand.  Then if you are adding mix ins do it at this point.  Then pour into a freezer safe container and freeze.  I recommend stirring the ice cream after about an hour or so if you have added mix ins.  Once frozen serve and enjoy! 
  
 • The first batch of Ice Cream I made was Chocolate Peanut Butter so I needed the Heavy Whipping Cream, Sweetened Condensed Milk, Chocolate Syrup, Peanut Butter Chips and Magic Shell Ice Cream Topping
• Beat whipping cream with an electric mixer until stiff peaks form
• To make the ice cream a chocolate flavor I added 1/2 a cup of Chocolate Syrup to my sweetened condensed milk and mixed it in well

 • Pour the chocolate sweetened condensed milk into the cream and stir well
• I then added peanut butter chips to the mixture.  I used a heaping 1/2 cup but you really can use as many as you'd like
• Pour into a freezer safe container and freeze for 1 hour
• After 1 hour remove container from freezer and cover the top of the ice cream with the Magic Shell topping and some melted peanut butter then put back in the freezer for another hour.  After an hour break up the magic shell and peanut butter and mix it into the ice cream.  This creates chocolate chunks in the ice cream and it's so good!  Place back in the freezer for at least 6 hours or more then once it's frozen serve in bowls and enjoy.
 • The second batch I made was Cookies and Cream and even though I'm a huge PB and Chocolate fan this was outstanding!  You will need the Sweetened Condensed Milk, Whipping Cream, Vanilla Extract and Oreos 
• Beat whipping cream until stiff peaks form then add the 1/2 tsp. of Vanilla and Sweetened Condensed Milk and mix well
• Add chopped Oreos to the mixture.  I didn't measure how many Oreos but just dumped them in until I got the desired amount I wanted
• Pour ice cream into a freezer safe container and freeze for at least 6 hours then serve and enjoy!

 What flavor will you make?

 Creamy and Sweet!

 Yummy in the tummy!

 So chocolatey and peanut buttery!

 Check out Kevin and Amanda's Blog for some other great recipe


Tuesday, February 19, 2013

. . . Cookie Time Tuesday -- Cake Batter Chocolate Chip Cookies . . .

I had pinned these cookies awhile back and thought about making them numerous times but since I've made Cake Mix Cookies with sprinkles before I just figured they'd be the same so I put it off.  I am SO glad I finally made them because these just might be our new go to cookie around here.  

Sally's Baking Addiction is an amazing blog and she did a real science experiment with these cookies to make them perfect.  If you haven't visited her blog you really need to because it's filled with amazing recipes and gorgeous photos!  

These cookies were made a bit differently because instead of rolling them up into a ball shape Sally recommended making them "Tall" and wow, it really made a difference.  I experimented with a few rolled in a ball compared to the cookies I made "tall" and the "tall" ones turned out so much puffier and thick and were actually chewier than the ones rolled in a ball.  Very interesting that it worked that way but I might just start making my cookies this way when it calls for rolling them in a ball--just make them "tall" instead!

 
 Cake Batter Chocolate Chip Cookies

makes about 2.5 – 3 dozen

Ingredients:
1 and 1/4 cup all-purpose flour
1 and 1/4 cup yellow or white boxed cake mix--I used white cake mix and it was perfect
1/2 teaspoon baking soda
3/4 cup (1.5 sticks) unsalted butter, softened to room temperature
1/2 cup granulated sugar
1/2 cup light brown sugar
1 egg, at room temperature
1.5 teaspoons vanilla
1 cup chocolate chips--I used half white chocolate chips and half semi sweet chocolate chips
1/2 cup sprinkles--I wished I would have used a heaping 1/2 cup so there were a few extra sprinkles in the batter for some more color
Directions:
In a large bowl, sift together flour, cake mix, and baking soda.  Set aside.  In a separate bowl, cream together the butter and sugars on medium speed.  Mix in the egg and vanilla until creamy.

Add the flour mixture to the wet ingredients and mix until just combined.  Do not OVERMIX the dough. Fold in the chocolate chips and sprinkles.


Cover and refrigerate dough for at least 1 hour, or up to 4 days.  This step is mandatory. The dough is fairly sticky, so chilling the dough is required in order to avoid the cookie from spreading too much.

Preheat oven to 350 degrees.


Scoop rounded tablespoons of the cold dough onto an ungreased baking sheet or a parchment paper or silpat lined baking sheet.  Shape your cookie dough balls to be “taller” than they are wide, as pictured below.  Make sure to keep dough chilled when working in batches. Bake for 10-12 minutes until edges are slightly browned.  (Mine took 11 minutes). The centers will still appear very soft, but the cookies will set as they cool.


Allow the cookies to cool on the baking sheet for 4 minutes and transfer to a wire rack to cool completely.  If you are like us you may not be able to wait until they cool completely!

 • Gather ingredients
• Cream butter and sugars together until fluffy
• Add vanilla and egg to mix and combine
• Add dry ingredients and blend just until combined

 • Add in the chocolate chips and sprinkles and mix until combined.  Place dough in fridge for at least one hour to chill the dough
• Once dough has had time to chill roll cookies to be "tall" instead of in a ball.  This will for sure make a better cookie.  I'm a believer now!
• Bake for 10 to 12 minutes in a 350 degree oven
• Remove to a cooling rack to cool completely

 Outstandingly Good!!

 My son took one bite of these cookies and said "Mom, I sure hope you made 5 batches of these!".  That is a raving review considering he is a Chocolate Chip Cookie kind of guy and doesn't deviate too much.

Enjoy!!

Sunday, February 17, 2013

. . . Wine Bottle Centerpiece . . .

We aren't big wine drinkers but over the holidays we had several empty bottles of wine lying around. Being the crafter that I am I just couldn't quite throw them out.  I'm glad I didn't toss them because I love how this turned out.

 After putting all the holiday decorations away I needed a quick centerpiece for my dining room table and went searching through my craft collection and decided why not spray paint the empty wine bottles and make them into candle holders.  Perfect!  

I grabbed some dollar store candles and 2 bottles of spray paint and I was set.  This couldn't be any easier!  I then put the finished bottles on a platter filled with dried split peas for a little more pop of color.  Easy Peasy!

 • • •
 • Grab a few empty wine bottles, spray paint and taper candles
• Spray paint the empty bottles (you must remove the labels first)
• Once the bottles have dried completely put your candles in the opening of the bottle and display
 Pretty!
Simple as that!

Thursday, February 14, 2013

. . . Happy Valentine's Day . . .

Hoping your Valentine's Day is filled with lots of  L♥VE!

Tuesday, February 12, 2013

. . . Cookie Time Tuesday-Butter Press Cookies . . .

When we were growing up my mom would make these cookies every Christmas and my sister and I would fight over who got to use the cookie press.  I think we probably fought over who was going to eat the cookies too because they are so good!  

These can't be any easier and they are so light that it's hard to eat just one!  If you don't have a cookie press you can always just roll them into small balls and bake them for a small round cookie.  Believe me they will taste just as good.

Many people call these cookies Spritz Cookies but this recipe is very different than what you will find when you search for a Press Cookie Recipe so I hope you enjoy it.


Butter Press Cookies
1 Pound of Butter, softened
1 tsp. Vanilla
1 Cup Powdered Sugar
4 Cups Flour

Cream butter and vanilla until fluffy.  Add powdered sugar until well blended then slowly add the flour.  Once the dough is mixed divide it up to add food coloring.  I used just 2 colors so I split the dough in half and added food coloring until I got the desired color.  I use Wilton's Food Color Gel to get a bolder color but you can use just the normal liquid food color and get great colors for your cookies.  Put dough in the cookie press and start pressing them out onto a parchment paper lined baking sheet and bake for 7 minutes in a 350 degree oven.  Remove to a cooling rack to cool completely.  
 
 • Gather ingredients
• Cream butter and vanilla until fluffy
• Add powdered sugar and combine well with butter mixture then add the flour until blended completely.

 • Divide dough up so you can make as many colors as you want.  I just wanted two colors for this batch so I split it in half and added Rose Food Color Gel by Wilton to get the pink and then I used the No Taste Red Food Color Gel by Wilton for the coral/red cookies.
• Fill your cookie press with the colored cookie dough
• Press cookies out onto a parchment paper lined baking sheet

 • Bake cookies in a 350 degree oven for 7 minutes.  These cookies look the exact same raw as they do when baked which is good to know they don't spread too much or puff up too much.
• Remove from baking sheet and place on a cooling rack until cooled completely

 Seriously delicious!  They are so soft and buttery.  These would be the perfect 
Bridal Shower Cookies!

 Yummy in the tummy!

Saturday, February 9, 2013

. . . Valentine, You Make My Heart POP Printable . . .

There are about a million adorable Valentine's Day ideas to choose from around Blogland and Pinterest so hopefully this will be one that is worthy of using for your Valentine's Day treats or at least Pinning for next year!
When thinking about what to do for my son's classmates and teacher's I was trying to come up with something a little different than candy but just kept drawing a blank.  Then I was walking through a store and saw a big display of popcorn near the Valentine's section and thought about phrases that could be used for Valentine's Day and popcorn.  Also, I was trying to think of how I could make popcorn cute and remembered a few years back when I threw a baby shower that I coated it in chocolate.  Next thing you know my cart was full of popcorn and chocolate coating and food coloring and all the cute stuff I needed to make these fun Valentine's Day treats.
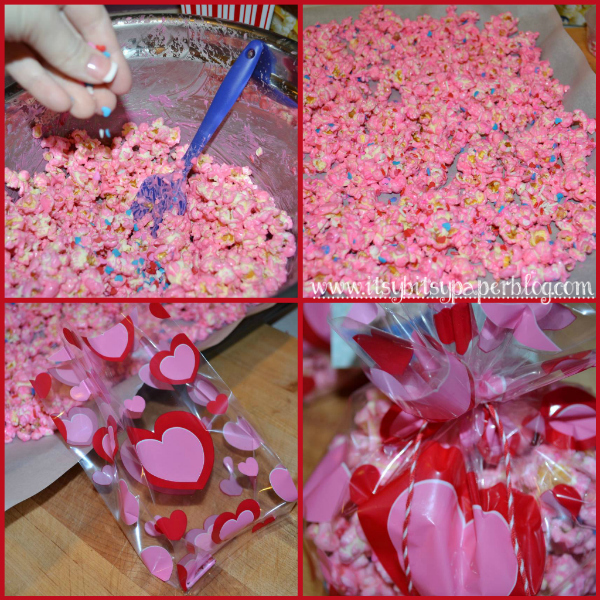
I am also sharing the recipe for Cupid's Crunch Popcorn (we made that up when we were making the popcorn).  It is so darn good!  I just used white melting chocolate and added Wilton Rose Gel Food color to the chocolate to make it bright pink and then grabbed Valentine's sprinkles and went to town.  Simple as that!  I put the popcorn in cute cellophane bags and added the tags with a piece of baker's twine and tada...You make my heart "POP" treats are ready to go!

To make the Cupid Crunch Popcorn you will need:
Popcorn--I used microwave popcorn
Melting Chocolate in color or flavor of your choice
Food Coloring Gel if you plan to color your chocolate
Sprinkles
You make my heart POP Tags (found at the bottom of this post)
Cello Bags
Ribbon or Twine

• Gather your ingredients
• I used the Wilton Rose Gel Food Coloring to make my chocolate bright pink
• You will need your tags which can be found at the bottom of this post
 • Melt your chocolate in the microwave then add food coloring gel and mix well.  Add more food color if you want a deeper/brighter color.  
• Pop your popcorn one bag at a time then pour into a large bowl
• Spoon the melted chocolate over the popcorn
• Stir chocolate into the popcorn adding more as needed to coat all the popcorn
 • Once the popcorn is covered in chocolate add sprinkles.  I have no measurements for this I just dumped until I was happy with the look of the popcorn
• Move popcorn to a parchment paper covered baking sheet o let cool then once chocolate has set break up into small pieces
• Fill your cellophane bags with the desired amount of popcorn 
• Tie bags with a piece of ribbon or baker's twine 
 • Add your tags to the bags and tie a bow and you are all set to give your Valentine's Day treats to someone special!
• For the teacher's treats I wanted a little something extra so I picked up these popcorn "boxes" at Target in the dollar bins and filled them up with the popcorn mixture and put them in a large cello bag
• Tied a piece of twine and the cute tags to the top of the teacher's treats and it's all set to give on Valentine's Day.
Easy Peasy!
 Popcorn goodness!

Yummy!

Happy Valentine's Day!

Tuesday, February 5, 2013

. . . Cookie Time Tuesday-Lemonade Cookies . . .

I baked these Lemonade Cookies and then when I was taking my photos it dawned on me that I actually shared this recipe before. A total senior moment I guess.  Soooo, since I messed up and I didn't have time to bake a new batch, since I waited until the last second to do these in the first place, I'm just going to share them again because they are really yummy!  

I promise next week I won't have a brain fart and there will be a new recipe for you!  If you haven't seen this one before then I'm glad you stopped by and hopefully you'll enjoy this recipe!  I really love how refreshing these are--even my husband will eat these and he isn't a sweet eater!   

 Recipe:
1 Cup Butter
1 Cup Sugar
2 Eggs
3 Cup All Purpose Flour
1 tsp. Baking Soda
¾ Cup Thawed Lemonade concentrate, divided
Lemon zest, optional

In a large bowl, cream butter and sugar until light and fluffy.  Add eggs, one at a time, beating well after each addition.  Combine the flour and baking soda; add to the creamed mixture alternately with ⅓ Cup lemonade concentrate, beating well after each addition.

Drop by rounded teaspoonfuls onto Silpat or parchment paper lined baking sheet.  Bake at 400 degrees for 8 minutes.  Remove to wire racks.  Brush with remaining lemonade concentrate.  Sprinkle with sugar and let cookies cool.  

**If you choose to use the lemon zest sprinkle some in the raw dough and then mix some of it into the sugar.  It’s just to add a bit more of a lemon flavor.
• Gather ingredients
• Cream butter and sugars until fluffy
• Add eggs one at a time mixing well after each addition
• Add flour and baking soda alternately with 1/3 Cup lemonade concentrate
 
• Since I wanted to use lemon zest I added it at the very end and mixed it in well
• Drop by spoonfuls onto a silpat or parchment paper lined baking sheet
• Bake for 8 minutes at 400 degrees.  
• Remove from oven and brush with remaining lemonade concentrate then sprinkle with sugar.  Remove to cool on a baking rack
 
 Lemony Goodness!

Yummy!

Enjoy!