Wednesday, October 16, 2013

. . . Dream Whip Dream Pie . . .

A few years ago we went out to dinner for Mother's Day and we had the absolute best chocolate mousse I've ever had.  On the way home my husband said "You really need to figure out how to make chocolate mousse that good".  Well, I tried several recipes and they were really good but none ever tasted quite as good as the restaurant's mousse.  So I moved on and haven't made anything similar in a long time until now.  I think this is the easiest pie you can make and it tastes heavenly.  My husband said it reminded him of that yummy chocolate mousse we had on that Mother's Day.  Wow, that is a compliment I would say since the other mousse recipes never lived up.

My grandmother always has Dream Whip packages at the ready but it is not something I have ever purchased until I found this recipe.  I can't wait for you to make this recipe because I know you'll love it.  If you've never used Dream Whip I think you will be a believer if you use it for this pie...I know I am for sure!


You will need:
2 envelopes of Dream Whip
2-3/4 C cold milk, divided
  1 tsp. vanilla
 2 pkg. instant pudding (I used chocolate this time around but can't wait to try others)
  1 pie crust (Oreo is perfect for chocolate pudding)
Beat Dream Whip, 1 C of milk, and vanilla on high speed for 6 minutes until the mix thickens and peaks form. Add remaining 1 3/4 cups of milk and both pudding mixes. Beat for another 2 minutes, scraping sides of bowl periodically. Spoon into pie crust and chill in the fridge for at least 4 hours.
 
 
 Gather your ingredients

 I love the Dream Whip box--so simple and sweet.  Very old school.

 You will find this recipe on the back of the box of Dream Whip and even some other great suggestions and don't forget the great cake recipe too!

 Whip your 2 packages of Dream Whip, vanilla extract and 1 cup of milk until thickened and peaks form

 
 Add your chocolate pudding mixes (or whatever flavor you choose) and add the rest of your milk and mix for about 2 minutes

Grab your prepared pie crust (I used store bought but you can use a homemade one too)

 Fill up your prepared pie crust with the Dream Whip mixture.  

 
 I had a fairly good amount of mixture left over so I just put them in ramekins and served them with a little cool whip on top.  My son thought these were better than the pie itself and I have to admit they were scrumptious too!

Enjoy!!

Monday, October 14, 2013

. . . Mountain Dew Apple Dumplings . . .

I have never shared a recipe without taking photos of it with my real camera but this one was so good I wanted to share it right away.  I apologize in advance for the ipad photos but it's worth making anyway!  If you want to look at beautiful photos of this recipe please be sure to stop by Pioneer Woman and check her post out too.

My husband loves anything apple--apple pie, apple bars, apple cheesecake, apple dumplings, you get it right?  Ok, so when I was cruising Pinterest and kept seeing this recipe pop up I knew it was a must.  I just happened to have almost everything in my kitchen to make it but I made due by using a can of Sprite instead of Mountain Dew and it was still amazing.

This is so darn easy and the sauce is so buttery tasting.  If I had the exact soda it called for I can't imagine it being any better but I suppose it's possible.  I even used Diet Sprite so I'm sure I made this recipe very healthy for us.

You will want to make this right away, I kid you not.

**I actually only had one package of Crescent Rolls in the fridge so you are seeing my recipe as just half the one below.
 
You will need:
2 whole Granny Smith Apples
2 cans (8 Oz. Cans) Crescent Rolls
2 sticks Butter
1-1/2 cup Sugar
1 teaspoon Vanilla
Cinnamon, To Taste
1 can (12 Oz.) Mountain Dew Soda (Or Sprite since I can tell you it's great) 

Peel and core apples. Cut each apple into 8 slices. Roll each apple slice in a crescent roll. 
Place in a 9 x 13 buttered pan.
Melt butter, then add sugar and barely stir. Add vanilla, stir, and pour entire mixture over apples. Pour Mountain Dew (Or Sprite) around the edges of the pan. Sprinkle with cinnamon and bake at 350 degrees for 40 minutes. Serve with vanilla ice cream or cool whip and spoon some of the buttery sauce from the pan over the top.

I will warn you now...this recipe is dangerously delicious and you may not stop at just one!
 
Serve warm with a big scoop of Vanilla Ice Cream or Cool Whip and enjoy! ♥

Wednesday, October 2, 2013

. . . Picture Frame into a Beautiful Tray . . .

I really don't recall where I first saw this idea but I am sure it was on Pinterest or on a blog so I apologize for not sharing an original source.  Either way it is going to blow your mind!  Ready?  Here we go!

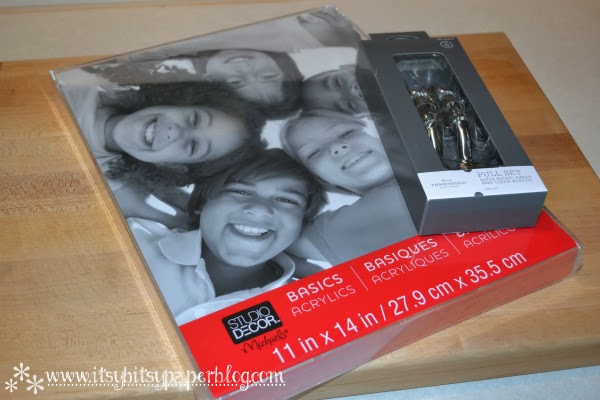
You know those inexpensive acrylic photo frames that you can buy at craft stores like Michael's?  Well I made it into a beautiful clear acrylic tray by turning it upside down and adding drawer pulls with E6000 glue.  Can't get any easier than that!

These would make such pretty gifts and the nice thing is you can do them in different sizes.  I am thinking you could use them for perfumes and lotions, a make up display, a coffee station, using them to serve party food, etc.  The list is endless for ideas.  I like the idea of lining it with pretty scrapbook paper or even a printed pattern with a monogram.  You could also use a vinyl sticker you print or you purchase to decorate it. 

As you can see I filled mine with dry split peas and a couple candles and some pumpkins.  This is perfect for a centerpiece or decoration amongst your other decor.  Whatever you decide to do with it you will love it and you will feel so crafty making it.


•You are going to need an acrylic photo frame in the size of your choice.  These are pretty inexpensive and you can use a coupon at Michael's for them.  I got an 11x14 size knowing I wanted it for a centerpiece and didn't want an 8x10 to be too small for my needs.  This one was just $4 and change with my coupon--can't beat that! 
• A set of drawer pulls of your choice.  I got mine at Target and loved how they were silver with a clear insert so it really looks like it was meant for this clear tray.
• E6000 Glue (the best stuff on earth)
 No one has believed me when I tell them this tray was made from a photo frame flipped upside down.  
 
 Turn the tray upside down so the open part is face up.  Decide where you want your drawer pulls then adhere them with E6000 glue. 

 To hold mine in place I just stuck a couple clothes pins over the drawer pull ends until they dried completely. 

 Of course I was impatient and couldn't wait to decorate with mine so I filled it up with the peas and pumpkins and candles even though the glue was still wet.  It wasn't going to effect the glue so I figured why not?

 Autumn is here!

 LOVE!

Pure genius!

Thursday, September 26, 2013

. . . Creamed Chicken Sandwiches . . .

Don't let the not so pretty pictures of this post deter you from making these awesome sandwiches!  

Growing up in Ohio we used to have these Creamed Chicken sandwiches for dinner periodically and everyone would inhale them.  Then when I took my first "real" job working at a Twistee Treat we served the Creamed Chicken sandwiches there but I quickly learned that many people had never heard of these.  Well, as an adult living in North Carolina if I mention these to anyone they look at me like I'm nuts so I decided I would Google the recipe and I actually found out that this sandwich is mainly known in Central and Northern Ohio.  Who knew!?  

There are lots of different recipes you will find for this sandwich but this one I'm sharing is how my mom always made them and it's now how I make them for us.  


Creamed Chicken Sandwiches
Shredded chicken (I used 3 cans of white chicken for this recipe)
1 can cream of chicken soup
1 can cream of celery soup
Salt, pepper and garlic to taste
 **You can make this recipe using fresh shredded chicken and just adjust your amount of soup depending on how much chicken you are using.  The mixture is supposed to be a little runny but not too runny so you can judge it by that as you add the soup.  I always know that to make it with 3 cans of chicken I need 1 full can of each of the two soups.

Shred your chicken and add desired amount of soup and seasonings to taste.  Heat over medium heat stirring occasionally and serve on buns when heated through.

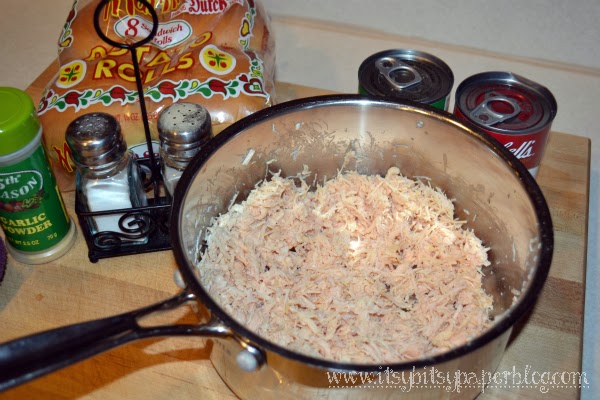
 Shred your chicken--either the fresh chicken or canned works perfectly

 Add your cans of soup to desired consistency.  As mentioned above I find that 3 cans of chicken requires 1 full can of each of the two soups but you can just adjust the amount of soup depending on how much chicken you are using.  Just don't make your mixture too runny or it won't stay on your bun.

 Add salt, pepper and garlic to taste.  I usually taste it as it heats because I find that most of the time as it gets hotter I want to have more seasonings.

 Heat over medium heat, stir occasionally so the chicken doesn't stick to the bottom of the pan.
 Serve your chicken mixture on buns and enjoy ♥

 I personally love mustard on my Creamed Chicken Sandwich but these taste great all by themselves too.

I hope you and your family enjoy these yummy Creamed Chicken Sandwiches as much as we do!

Tuesday, September 24, 2013

. . . Homemade Caramel Shortbread Candy Bars . . .

Who has heard of Twix candy bars?  Um, of course everyone has.  Well, these are a fantastic homemade version!!!  Oh my goodness run, don't walk, to your kitchen to make these bad boys!

I came across this recipe when I was cleaning out old magazines.  It was in a Kraft Foods magazine which always has the best recipes.  I don't know why I never made this but sure am glad I made it yesterday!  I have had to hide these from my son and husband and really wish I could hide them from myself but I keep remembering where I put them.

These can't be easier and I promise if you have a microwave you can make them and you will be sure to impress your family and friends.

 Homemade Caramel Shortbread Candy Bars

35 square shortbread cookies (Lorna Doone Cookies)
1pkg.  (11 oz.) KRAFT Caramel Bits--these are found in the same spot as chocolate chips
1Tbsp.  milk
6 to 8 ounces milk chocolate chips
  
Line 13x9-inch pan with foil, with ends of foil extending over sides; spray with cooking spray. Arrange cookies in single layer on bottom of prepared pan. 
 
Microwave caramel bits and milk in microwaveable bowl on high for 1-1/2 to 2 min. or until bits are completely melted and mixture is well blended, stirring after each minute. Pour over cookies; spread to completely cover cookies. 
 
Microwave chocolates in microwaveable bowl for 2 min. or until almost melted, stirring every 30 sec. Stir until chocolates are completely melted, making sure you don't get the chocolate too hot. Pour over caramel layer; spread to completely cover caramel layer. 
 
Put bars in the fridge for about 2 hours then remove foil and bars from pan.  Remove the foil from the bars then lay the bars on a cutting board and cut into bars.  Serve as soon as possible!


 Using the foil to line the pan is a MUST!  It makes removing and cutting these so easy.


 I cut mine into small bars because they are rich and I didn't want them to be too large.


This recipe that is going to make everyone impressed with your cooking skills!

 One word...YUM!

Saturday, September 21, 2013

. . . Easy Homemade Caramels . . .

When I had one of my bridal showers someone gave me a candy thermometer.   That was now 12 years ago and I finally busted that bad boy out to make these caramels.  Can you guess that this was my first attempt at making any type of candy since that handy dandy thermometer has been in my drawer for 12 whole years?  

I have to admit that I have always been afraid to make homemade candy.  When we were kids my mom would make homeade hardtack and we just loved it but I have never attempted anything like that on my own.  
 
 When I came across this recipe over on my new favorite blog, Butter, with a side of Bread I knew I had to give it a go.  It just sounded too easy to be true so my little behind ran right to the store to grab the ingredients I needed which was just the whipping cream but still it meant a trip to the store.  I came home and got to work.  After about fifteen minutes I knew my thermometer must be broken, afterall it is 12 years old so I'm sure they must break when you don't use them right?  Well out came the ipad so I could google how long it would take to get caramel to the firm ball stage.  Yep, it was going to take awhile.  I have now made this recipe twice and have figured out that either my stovetop isn't very hot or all those other people are lying when they tell you it only takes 15 minutes to get to 248 degrees.  For me it took at least thirty minutes or more to get it to that temp both times.  After twice I'd say I'm an expert candy maker wouldn't you?  No you say, well you are right I have a lot to learn but I do think this recipe is a great beginner recipe if you want to start venturing into the world of candy making.  

I gave these homemade caramels out for teacher gifts for the first day of Fall and Marcus came home saying that one teacher said she had died and gone to Heaven and another said she was coming unglued they were so good.  Rave reviews if I do say so myself.  I shouldn't tell you that my husband said they were just alright but he isn't a candy lover so you should just ignore him like I did.  Listen to the candy making expert that I am when I tell you these were insanely good!
 Homemade Caramels
2 cup white sugar
1 cup packed brown sugar
1 cup corn syrup
1 cup evaporated milk
1 pint (2 cups) heavy whipping cream
1 cup butter
1 1/4 tsp. vanilla extract

In a medium size pot, combine everything except the vanilla. Monitor the heat of the mixture with a candy thermometer while stirring occasionally. When the thermometer reaches 245 to 250 degrees  remove pot from heat.
Stir in vanilla. Transfer mixture to a foil lined greased 12x15 pan and let the mixture cool completely. You can put it in the fridge to speed the process. When cooled cut the caramel into small squares and wrap them in wax paper for storage.You can also roll the caramels into a "log shape" because they are very pliable then wrap them in wax paper.  I have set mine out in a bowl but if you want to save them for awhile just keep them in the fridge.

 Gather up your ingredients and get ready to become a Master Candy Maker.

 When you put your candy thermometer in the pot make sure it's close to the bottom of your pan but not touching it.  It will take a little while so just be patient and don't stir the mixture constantly but instead just stir now and then while you wait for the temp to rise.

 About this stage I was getting really impatient but my thermometer was still saying it was at 225 degrees.  I realized after the first batch that you can also tell by the color of your mixture when they are done.  This color above is more like a caramel sauce so you want to wait until it gets almost a chocolatey brown color.  I will admit that both batches made me very angry because right about the time the temp hit 245 the caramel burnt on the bottom of the pan so when I poured it into the greased cookie sheet the little burnt flecks ended up in my caramel.  Oddly enough there was no burnt taste to the dark bits but it just didn't look pretty.  That was actually why I made them again because I wanted them perfect but it happened the same way.  I think maybe using a nonstick pot might help but I'm not sure.  I kept my heat at medium the entire time so it would not burn but both times it did.

Once the caramel mixture has reached the desired heat add your Vanilla and mix well.  Then pour your caramel mixture into the prepared pan and let them cool completely.  I put mine in the fridge to get them really cool and solid because I read online that they are easier to work with when they are cold.  I would say that was true because they were less sticky when really cold.

 I don't know what I would have done without this flat cutting tool (I call it a pasta cutter but don't know what it really is called) and my marble pasty board.  Ok, well yes I do know what I would have done...I would have used a knife and a cutting board. The tool and the marble did make this project a cinch but it would have been just as easy with a knife so don't fret if you don't have one of the cutters just use a knife and a cutting board.  You can see a few of the dark flecks that ended up in my caramels in the above photo but I promise this doesn't change the taste at all.
 Cut your wax paper into rectangles and wrap the caramels up and twist the ends.  Be prepared that this step takes awhile. 

 I was one happy camper when I wrapped my last caramel let me tell you!  They look great though and taste even better.

 As I mentioned I gave these out for teacher and staff gifts so I printed a cute tag and used some of the dollar bin containers from Target.

 I put each container down in a clear cellophane bag and tied the tag with a few pieces of Baker's Twine and the gifts were ready to go to school.

 If you are like me you don't want to keep too many of these babies at home because they are dangerous let me tell ya!  Yummy!!

I hope you enjoy them and take a chance and make them.  If you don't have a candy thermometer just google how to make candy without a thermometer and you will get lots of info about how to drop the mixture into cold water.  It works because I used both methods just to see and was very pleased with it.  Good luck!

Friday, September 20, 2013

. . . First Day of Fall Sale . . .

The perfect time to purchase your holiday gifts and fall cards!