Monday, October 31, 2011

. . . 2012 Personalized Calendar Giveaway . . .

Giveaway is now CLOSED

It's time for the Itsy Bitsy Paper 2012 PERSONALIZED Desktop Calendar GIVEAWAY

You will receive ONE 2012 Personalized Desktop Calendar.  Every month offers a fun and whimsical design with the holidays printed in a complimentary color.  All months are personalized with your name so it makes for a truly unique Desktop Calendar!


To ENTER you need to leave a seperate comment for each step and be sure to leave your email address.  Each person has up to SIX chances to enter:

1.  Become a FOLLOWER of Itsy Bitsy Paper's Blog
**The only requirement to enter**

BONUS ENTRIES
1. Tell me which month is your favorite design

2.  Become a Facebook Fan of Itsy Bitsy Paper
3.  Follow Itsy Bitsy Paper on Pinterest

4.  Post about this giveaway on Facebook, Tweet About, or Blog about it!
5. Make a purchase from Itsy Bitsy Paper 
Giveaway is open from October 31, 2011 to November 6, 2011
at MIDNIGHT EST
 
Thank you for entering!

Saturday, October 29, 2011

. . . Have a BALL Treat Topper Download . . .

I know I am so last minute but if I am then probably there are a lot of other mom's out there that are doing the same rushing that I am doing.  I wanted to have these treat bags to my son's classmates this past Thursday but it just didn't happen so now we are bagging them up today so he can take them on Monday.  I figure Monday is the actual day of Halloween so it's perfect, right?  Exactly on time I would say.  

How simple to fill snack bags with Cheese Balls and add a topper that says "Hoping you have a BALL this Halloween".  These are sized to fit a snack size ziploc bag. Print them on cardstock and cut them to the size needed and then fold them in half and staple them over the top of the ziploc bag and it makes a great treat!

 DOWNLOAD HERE
*Personal Use Only!

 • Print out your toppers and fill up the ziploc bags
• Seal bags and stable your folded topper over the top of the bag


Let me know if you use these for your kids! I'd love to hear or see the pictures.

Linking up here:

Friday, October 28, 2011

. . . Holiday 2011 Desigsn . . .

I know that we all have Halloween on our mind but I've been busy trying to find Holiday inspiration for my 2011 Holiday Cards.  I have more in mind but these are the first of the bunch I've created so far.  Invitations are coming soon!


. . . FunFridayFinds-Halloween Printables . . .

There are about a gazillion Halloween Printables floating around blogland!  I really don't have a favorite because there are so many but I gathered up a few from this year that I really liked.  If you are like me there is still a few more days to create some fun things for Halloween and these Printables are all super easy ways to add some festiveness to your home.  They also would make a great last minute gift!

Have a Happy Halloween!

| : | : | : | : | : | : | : | : | : | : | : | : | : |
 • Ghost Dectective @ Delightfully Noted
• Boo Chevron Printable @ Two Twenty One
• Halloween Subway Art @ Eye Candy Events
• Printable Tags @ The Twinery

 • Favor Tags @ Living Locurto
• Happy Halloween Print @ Blooming Homestead
• Halloween Tags @ Catch My Party
• Scary Print @ Poppies at Play

• Halloween Printable from Itsy Bitsy Paper

Do you have a Printable you are offering or a favorite that you have used this season?  I'd love to hear about it in the comment section!

Thursday, October 27, 2011

. . . Halloween Candy Bark . . .

I am always trying to think of fun and quick gifts so Candy Bark is a go to recipe!  It is always a huge hit and makes such a fantastic gift and better than that it is easy!  I also like that you can pretty much make it with anything you have around the house.  

 I USED:
White chocolate
Oreos
M&Ms
Pretzels
Nuts
Candy Corn
Sprinkles

 • Gather your ingredients
• Melt chocolate

 • Line a cookie sheet with parchment paper or wax paper and pour your chocolate on it
• Add all of your toppings and press everything into the chocolate and then put in the fridge until hardened so the bark breaks up very easily

 Yummy in the tum tum!


Enjoy!!

Linking Here:

Wednesday, October 26, 2011

. . . Halloween Yarn Wreath . . .

This was such an easy wreath to make!  I love using yarn for decorating because it's cheap, colorful and fun!  I took a plain frame I had laying around and spray painted it black then added some fun Halloween colored yarn to the four sides and then hung a little Halloween sign in the middle.  It's the perfect addition to the window on my front porch.


 • I started with a spray painted frame and a bunch of fun Halloween colored yarn
• Wrap the yarn around the frame.
• I left the corners free of yarn so my frame would show. 
• Add a cute little sign and you have a fun wreath!

 Fun!

Tuesday, October 25, 2011

. . . CookieTimeTuesday-Cranberry Chocolate Chip Cookies . . .

I love Great Harvest Bread so when they showed a recipe for Cranberry Chocolate Chip Cookies on our local news I knew it was a must for an upcoming Cookie Time Tuesday.  These sure didn't disappoint!  I would not bake them for as long as they called for because the outside just got too brown and the cookie ended up crunchier than I like.  By the last batch I baked I finally got it right...in my oven it took about 9 minutes at 375 to get the perfect combination of crunchy and soft.

I hope you enjoy this one because it's a perfect Fall Cookie to serve.  They'd be great with White Chocolate Chips too!

Print Recipe Here
You will need:
2/3 Cup Soft Unsalted Butter
2/3 Cup Light Brown Sugar
2 Large Eggs
1 ½ Cups Old Fashioned Oats
1 ½ Cups Flour
1 Teaspoon Baking Soda
½ Teaspoon Salt
1 Cup Dried Cranberries
1 Cup Milk Chocolate Chips
 : : : : : : : : : : : : : : : : : : : : : : : : : : : :
 • Gather ingredients
• Mix sugar, butter and eggs
• Add dry ingredients and mix well
• Add cranberries and chocolate chips

 • You dough is very thick
• Place on parchment lined or silpat lined baking sheets by using a large spoon or scoop
• Bake and move to cooling rack to cool
• Eat and Enjoy!

YUMMY!

Linking Here:

Saturday, October 22, 2011

. . . Halloween Glam Topiary . . .

I'm so excited to be guest posting this project over at Snowcones and Lollipops!  I love this blog so I was super excited when I was asked to share a post here.  I hope you will stop over and check her out.

I wanted to redo my dining room table with a Halloween "Glam" Centerpiece so I decided to make a couple Halloween Topiaries.  I love the dollar bins at Target so I hit those up a couple weeks ago and grabbed the damask "baskets" and then a couple bath sponges that were trimmed in green.  I added a green glittered skull and some black and deep purple tea lights with black and white ribbon wrapped around them and a piece of burlap.  Perfect and easy.  

I loved making my Valentine's Day Topiary from a bath sponge so when I saw these in black I knew what I was going to make for sure.

 : : : : : : : : : : : : : : : : : : : : : : : : : : : : : : : : :
 • Gather up your supplies
You will need:
Dowel Rods
Container
Foam block
Basket filler
Bath Sponge
Paint
Ribbon
Glitter
Rubber Spiders
Glue
• Cut the dowel rods to the height you want them and then paint them
• Cut the foam block to fit your container

 • Dab Mod Podge on the spiders where you want the glitter to stick
• Pour glitter over spiders and let dry
• Glue the foam block into the bottom of your container
• Stick the painted dowel rod into the foam block then cover with basket filler

 • Use hot glue to attach the bath sponge to the dowel rod
• Glue the glittered spider in place
• Attach an embellishment to the front of the basket if you wish
• Add ribbon to the dowel rod pushing it up tight against the sponge

 • You are set now with the topiary
• Gather up some tea lights in the colors you want
• Cut the ribbon to wrap around the tea lights.  Attach by using just a small amount of glue to the ends of the ribbon
• This is always an easy way to dress up tea lights for parties.

 I cut a piece of burlap and laid it out on the table and then added my topiaries, glittered skull and candles and now I have a pretty Halloween Table.  

 I can't wait to make a version of this for Christmas!

Linking Here:

Friday, October 21, 2011

. . . FunFridayFinds-Caramel Apple Recipes . . .

I recently was asked to create an Apple Invitation for an Engagement Party so that and the Caramel Apple Food Challenge has made me have apples on the mind.  After seeing some of the amazing Caramel Apple Recipes yesterday I decided to make Fun Friday Finds a list of my favorites from the Challenge.  Honestly, this was a difficult decision because every recipe sounded amazing but I chose 10 of my favorites.

 • • • • • • • • • • • • • •
Here is the invitation I created for a customer that 
was throwing an Engagement Party:

 • Apples with Salted Caramel PB Dip @ SixteenBeans
• Hot Spiced Caramel Cider and Apple Wontons @ Joy in the Jumble
• Caramel Apple Pie @ From Cupboard to Cupboard
• Caramel Apple Pie Cupcakes @ Just Putzing Around The Kitchen

 • Caramel Upside Down Cake @ Something Swanky
• Caramel Apple Cream Cheese Mousse @ Mimi's Kitchen
• Hot Caramel Apple Cider @ From Which Things Grow
• Caramel Apple Cake Pops @  52 Mantels

 • Caramel Apple Pie Popcorn @ Sugar and Spice and All Things Iced
• Caramel Apple Spiced Cider @ Domessticated

What were some of your favorites?  
There were so many!!

Thursday, October 20, 2011

. . . Caramel Apple Cheesecake Bars . . .

I am so excited to be invited to participate in the Lady Behind The Curtain Improv Cooking Challenge.  Sheryl is a genius for starting this fun Linky Party.  Each month we will be given 2 ingredients that we must use in our recipe and then everyone that was invited will link up and share the recipes.  This month our 2 ingredients that had to be used are Apples and Caramel.  When I received the email with the invitation and the recipe requirements I knew exactly what I'd be making!

This is the perfect Fall dessert!  I have been making this recipe for a few years now and everyone always really enjoys it.  I don't know why I never make it any other time of the year but it's always on the menu at some point in the fall.
 : : : : : : : : : : : : : : : : : : : : : : : : : : : : : : : : :
 Print Recipe HERE
Crust:
2 cups all-purpose flour
1/2 cup firmly packed brown sugar
1 cup (2 sticks) butter, softened

Cheesecake Filling:
3 (8-ounce) packages cream cheese, softened
3/4 cup sugar, plus 2 tablespoons, divided
3 large eggs
1 1/2 teaspoons vanilla extract
Apples:
3 Granny Smith apples, peeled, cored and finely chopped
1/2 teaspoon ground cinnamon
1/4 teaspoon ground nutmeg
Streusel topping
1 cup firmly packed brown sugar
1 cup all-purpose flour
1/2 cup quick cooking oats
1/2 cup (1 stick) butter, softened


 • Gather ingredients
• Mix crust ingredients together
• Line a 9x13 pan with foil
• Press crust mixture into foil lined pan

 • Combine the sugar and cream cheese together
• Add eggs and vanilla
• Cut and peel Granny Smith Apples
• Cut apples into small chunks

 • Add sugar, cinnamon and nutmeg to apples
• Pour cheesecake mixture over the baked crust
• Mix up your streusel topping then top cheesecake filling with apples and streusel topping
• Bake and let cool then top with caramel topping

 How delicious!!


Tuesday, October 18, 2011

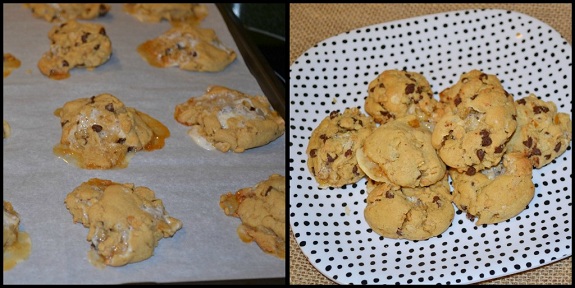
. . . CookieTimeTuesday-PB Rice Krispy Treat Cookies . . .

Who doesn't love Rice Krispy Treats?  I know in our house they are always enjoyed even though I don't make them very often.  This cookie is so unique because it combines a Peanut Butter Chocolate Chip Cookie with a Rice Krispy Treat.  Wow!

This recipe came from Stephanie's Kitchen--a great blog!  There isn't a recipe on there that isn't wonderful.

A couple tips:
**Make sure you use Parchment Paper on your cookie sheets
**Let the cookies cool on the Parchment Paper before you start trying to move them to the cooling rack
**I would use less Marshmallows next time I make these.  I am going to try 1 Cup instead

::::::::::::::::::::::::::::::
 Print Recipe HERE
You will need:
2 1/4 cups all purpose flour
1 teaspoon baking soda
1/4 teaspoon salt
1/2 cup butter, at room temperature
1/2 cup peanut butter
1/2 cup sugar
3/4 cups brown sugar
2 eggs
1 teaspoon vanilla extract
1 3.4 ounce pkg vanilla instant pudding mix
1 1/2 cups miniature marshmallows
1 cup mini semi sweet chocolate chips
2 cups Rice Krispy Cereal

 • Gather your ingredients
• Combine the butter, sugars and peanut butter.  Add eggs and vanilla
• Add Vanilla Pudding
•Add flour mixture to wet ingredients

 • Add the marshmallows and chocolate chips
• Add rice krispies stirring by hand
• The dough will be thick and crumbly
• Roll into balls and place on parchment lined baking sheets

 • Bake 10 to 12 minutes on 350 degrees
• Let them cool completely on parchment paper then move to cooling rack and then enjoy!

Yummy in the tum tum!!

Linking Here: