Thursday, September 22, 2011

. . . Juice Bottle Ghosts . . .

I buy Trop50 Orange Juice and I love the shape of the bottle.  I'm always brainstorming ideas on what I can do with them instead of tossing them out.  I decided to use up a few of my stash and make Ghosts for Halloween.  If I do say so myself I think they turned out really good.  My son just loved them when I put them out so anytime he is complimentary I know I'm on to something.
 You will need a Tropicana OJ Bottle or something similar
Spray Paint
Wood circles and ovals or something similar to create the face
Black Rafia
Mini Cupcake Liners
 Spray Paint your bottles-this took several coats
I purchased my bag of wood pieces at Michael's
I layed out all the faces prior to spray painting them black so I knew which pieces to use
 Once the pieces for the face dry use E6000 glue to adhere them to your bottles
Let them dry while laying flat or they will slip down the bottle--not pretty
Use a mini cupcake liner to cover the top of your bottle.  You'll want to cut little slits all around it so it folds neatly. 
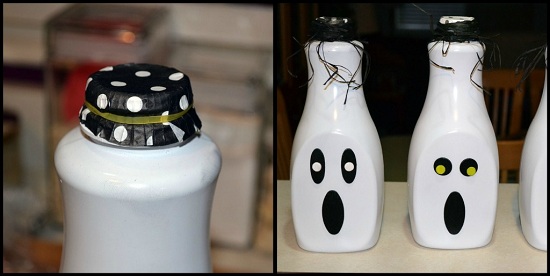
Put a rubber band around the cupcake liner to hold in place while you wrap the bottle top with rafia ribbon.  Leave some "stringy" pieces for decoration
So much better than just tossing them out! 

Linking Here:

A place called home

Tuesday, September 20, 2011

. . . Cookie Time Tuesday-Pumpkin Oatmeal Cookies . . .

Fall is just about officially here but I am beyond ready so I broke out a Pumpkin recipe for the cookie today.  It ended up being a little more like a breakfast cookie but don't let that discourage you--it's still fabulous.  It's almost like eating a muffin in a cookie.  I think next time I'm going to add a few mini chocolate chips because let's face it chocolate makes everything better.  This recipe came from Skinny Taste--a great blog!


 :::::::::::::::::::::::::::::::::::::::::::::::::::::::::::::

 . . . Print Recipe HERE . . .
You Will Need:
1 cup all purpose flour
2 cups quick oats
1 tsp baking powder
1/2 tsp baking soda
1/2 tsp salt
1/2 tsp ground cinnamon
2 tsp pumpkin pie spice
2 tbsp unsalted butter, room temperature
1/2 cup sugar
1/2 cup unpacked brown sugar
1 large egg
6 tbsp canned pumpkin (not pumpkin pie filling)
2 tsp vanilla extract
3/4 cup chopped pecans

• Gather ingredients
• Mix the dry ingredients together 
• Cream butter and sugars until smooth
• Add eggs, vanilla and pumpkin and mix well

• Add the blended dry ingredients to the pumpkin mixture
• Add pecans
• Your dough will be very thick
• Drop the dough by tablespoonfuls onto a parchment or silpat lined baking sheet

Bake and cool 
Eat and Enjoy!

 Delicious and Addictive 

Linking:

Monday, September 19, 2011

. . . New Fill In The Blank Thank You Notes . . .

I get a lot of requests for Fill In The Blank Thank You Notes and I love doing them but I've never listed them in my shop.  Now they are AVAILABLE to you!  If you have any custom requests please let me know and I'm happy to give it a go.


www.itsybitsypaper.com

. . . Lightbulb Vases . . .

I always use clear round lightbulbs in my bathroom light fixtures and I typically just throw them away when they burn out.  This time when I was changing a bulb a "Lightbulb" went off in my head and I thought why not use them for something.  Sooo, I decided to do a search on how to clean out a lightbulb and found a site that offered basic instructions on how to go about it.  It really is pretty easy!

One warning I will give is that you need to be super careful when you "break" out the black end of the bulb because it is razor sharp.  I know because I got a sliver of it in my finger so just be careful.  I did mine over a trash can to make sure that all the pieces went in that instead of on the floor or the counter.

You can use these for vases like I did or you could wrap the top with wire and hang them or fill them with tinsle for the holidays and so much more.  I can think of many things I'd like to use them for--what a great Christmas Tree ornament you could make too.  Have fun!

 Lightbulb Vases
 You Will Need:
Clear Lighbulbs
Needle nose plyers
Small screwdriver
Large Washers
E6000 Glue
Flowers

 • Gather your supplies
• Use your plyers to grip the little center "button" and pull hard to get it out.  I found that the easiest way to do this was to bend it upright so you had an area to grip.
• Take a mini screwdriver and start popping out the black piece over the trashcan.  Be very careful!
• You will have to break out the filament with a screwdriver and shake out the glass.  You will also have to pull the wire out.  Now your bulb is empty and ready to use.

 • If you are going to use these as vases instead of hanging them you will need to create a base.  I found the cheapest and easiest solution was a large washer.  Apply E6000 Glue around the washer.
• Place the bulb on top of the washer--you can place the bulb straight up and down or at a tilt like I did.  Let the glue dry for at least 4 to 6 hours.  Don't try to move them or the bulb won't stay attached to the washer.

 Simple, Unique and Pretty!


Friday, September 16, 2011

. . . Fun Friday Finds-Football Fever . . .

Tis the season for FOOTBALL!  It is here upon us and there are so many fun ideas out there for you to host a great football themed party.  I thought I'd share a few of my favorites right here on Fun Friday Finds.


 • Football Cheeseball @ Entertain Exchange
• Football Popcorn @ Catch My Party
• Football Cupcake Wrappers @ A Few of My Favorite Things
• Football Whoopie Pies @ Amy Atlas

 • Team Wreath @ The High Heeled Hostess
• Football Brownies @ The Belles of Saturday
• Football Cookies @ Eighteen25
• Astroturf Can Koozie @ Greenbean's Crafterole

For the Kiddos
• Football Crayons @ Tailgate Throwdown
• Football Drink Boxes @ Catch My Party

What is your favorite thing to serve or decorate with during football season?

Wednesday, September 14, 2011

. . . Birth Announcement . . .

I'm so excited to share this post with you!  I have a friend that had a baby in June and as terrible as it is I hadn't seen her to give her this gift so I couldn't post it on my blog.  Now she has the gift and I can share.  Isn't this a great gift?  A framed print of a Birth Announcement--what new mom wouldn't love that.  I do not have these listed for sale in my Shop but please feel free to let me know if you are interested and I'm happy to do them for you.


 I bought an 11x14 frame that included a white mat.  I knew I wanted a double mat so I just used some scrapbook paper cut to fit the opening.  I printed my birth announcement to be an 8x10 but I cut it down so the brown would show as well.

 I flipped the mat upside down and added a small piece of tape to each corner of the backside of the brown so it would stay in place.  Now you have an opening of just brown paper.

 Now use a tape runner or double stick tape and put it on the back of your birth announcement or print that you are using.  Attach it from the front side so you can see the amount of border showing.  There you have it.  Stick it in the frame and you have a great gift.  I had purchased coordinating buttons to dress up the frame but I really liked the simplicity of it just as it was.


Linking here:

Tuesday, September 13, 2011

. . . Cookie Time Tuesday-Chocolate Dipped Peanut Butter Cookies . . .

I am so excited to be guest posting today at Curly Willow DIY!  
(I am not sure when this post will go live on their blog but it is sometime today-the 13th of September)

I do a Cookie Time Tuesday every week featuring a new Cookie Recipe.  It is so much fun to give them a try each week and knock on wood I've not had a single recipe that hasn't turned out yummy.  Each week I laugh and say that I have a new favorite cookie until the next Tuesday.

This cookie is so simple but looks amazing and tastes even better!  How can you go wrong with Peanut Butter, Nuts and Chocolate?  The cookie recipe is a super simple flourless PB Cookie that is great by itself or dipped in chocolate and nuts.

 • • • • • • • • • • • • • • •
 Print Recipe HERE

You will need:
1 cup peanut butter
1/2 cup (packed) light brown sugar
1/2 cup granulated white sugar
1 large egg
1 teaspoon baking soda
1/2 teaspoon vanilla extract
½ cup mini chocolate chips 
1 bag milk chocolate chips
1 cup chopped peanuts

 • Gather Ingredients
• Mix the first 6 ingredients together
• Add mini chocolate chips to batter and mix well
• Roll into balls and place on a baking sheet.  Flatten with tines of a fork
• Bake cookies for about 10 minutes
• Melt the bag of milk chocolate chips
• Dip cookie in melted chocolate only covering halfway then dip in nuts
• Lay dipped cookies on parchment paper to let the chocolate harden

YUMMY in the TUMMY!