Friday, July 8, 2011

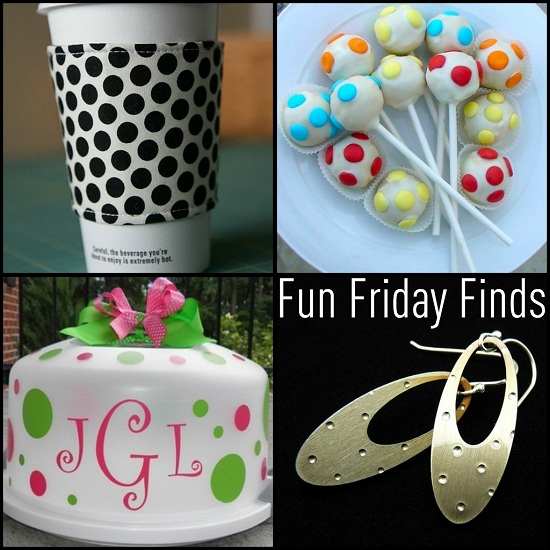
. . . Fun Friday Finds . . .

Polka Dots Galore!  This is such a classic design and I love it.  I can't believe I haven't done a Fun Friday Finds on this before but here it is....Polka Dots!  All of these items are available through Etsy.


Polka Dot Ring @ Ashley Jewelry
Polka Dot Vinyl Wall Art @ Look Sugar
Polka Dot Tie Bib @ Chic Couture Boutique
Polka Dot Cupcake Holder @ Simple Tastes

Polka Dot Coffee Koozie @ tinamagee
Polka Dot Cake Pops @ Mamas G Free Cake Balls
Polka Dot Cake Carrier Kit @ 2 Monkeys Boutique
Polka Dot Earrings @ The Raven Iron

Polka Dot Photo Frame @ Hart Laine
Polka Dot Necklace @ 3Squares
Polka Dot Necklace @ Fine Dolly Lolly
Polka Dot Straws @ The Party Fairy

Don't you just L♥ve these items!?

Thursday, July 7, 2011

. . . Oil Rubbed Bronze Spray Paint . . .

I have found my new favorite spray paint...Oil Rubbed Bronze!!  This stuff is amazing, but be warned if you buy a can you'll be hooked.  Just remember, I warned you...

I hate the builders grade light fixtures and switch plate covers that are in our house so I slowly started changing them out but it was costing me a fortune.  I also had some odd switch plates that needed to be special ordered and of course those were costly and I was dragging my feet on getting them. 

I was in the mood to paint and I was searching my house for a good transformation project when a lightbulb went off and I thought "why not paint my light fixtures and switch plate covers with oil rubbed bronze spray paint?"  
I did every switch plate cover that hadn't been changed yet and I did 3 bathroom light fixtures and love the result.  It's almost as if the paint actually makes the cheap plastic feel like metal.  I spent a total of $25.00 on three bottles of oil rubbed bronze spray paint and 1 bottle of brown primer.  I used Rustoleum brand and was very happy with it.

You will not want to skip the primer step even though it's a pain!


:::::::::::::::::::::::::::::::::::::::::::::::::::::::::::::::::::::::::::::::::::::

• Gather all of your items you plan to paint.  You will want to use a smooth grit sanding block to sand all the surfaces you plan to paint.
• After everything is sanded use your primer to coat the items.  I did one to two coats of primer depending on how well it covered the first time.
• Apply the Oil Rubbed Bronze Spray Paint to the items.  It took me two to three coats to get the look I was going for.

• You will want to make sure you paint all the screws that come with your switch plates or light fixtures.  I found the best way to do this was to grab a piece of styrofoam and stick all the screws down in it and paint first with primer then with the Oil Rubbed Bronze paint.
• I did a large batch at one time.  I had about three stations set up because I was doing so many.

• Oil Rubbed Bronze Spray Paint and a manicure don't mix
• Make sure you let everything dry completely or you will end up with alot of dings when you go to put them up.  This is always the hardest part for me because I'm so anxious to finish up and see how great it looks but it's worth the wait time.

 It's amazing how there are gold flecks in the paint that make it look so realistic that no one would think it isn't the real deal.

Linking up here:

Tuesday, July 5, 2011

. . . Cookie Time Tuesday--Chocolate Oat Chewies . . .

I think this is my new favorite cookie--well, until next Cookie Time Tuesday.  This cookie is fantabulous!  I could eat the toasted coconut like it's candy.  This cookie is soft, chewy and full of flavor but best of all it's an easy cookie to make!  If you like chocolate and coconut you will enjoy this cookie for sure!


You will need:
Devil's Food Cake Mix
Old Fashioned Oatmeal
Toasted Coconut
Melted Butter
2 Eggs
Vanilla
Hershey Bars

Print Recipe HERE


• Gather ingredients
• Mix all ingredients together except for
1/2 cup of toasted coconut and chocolate bars
•Combine well
 
• The dough will be thick and need chilled for 15 minutes
• Toasted coconut
• Roll into 1 inch balls
• While the cookies bake cut up your chocolate bars


• Bake for 12 minutes
• Press a chocolate piece into the center of each cookie than add your toasted coconut
• Let cool on cookie sheet for a few minutes then move to a cooling rack to cool completely

Linking up here:

Monday, July 4, 2011

. . . Happy 4th of July . . .


Don't forget to check out all the amazing Red, White and Blue Projects posted on my Linky Party!

Sunday, July 3, 2011

. . . Red, White and Blue Linky Party . . .


I have had a great time doing all sorts of Red, White and Blue projects, recipes and features this past week!  I figured why not have a Red, White and Blue Linky Party to finish out the week?  I'm super excited because this is the first ever link party I have hosted so I hope you will join in on the fun!


For this Linky Party:

**Please become a follower of Itsy Bitsy Paper's Blog

**Link ONLY red, white and blue projects

**Link back to Itsy Bitsy Paper in your post

That is it....Let's Party!
Please spread the word about this fun party!


Saturday, July 2, 2011

. . . 4th of July Party Decor . . .

For the last day of Red, White and Blue Week I thought I'd share some great ideas for adding some "flare" to your 4th of July Party.  I love all of these ideas and they are sure to spruce up any party.


Independence Day Print @ The Crafting Chics
Red, White and Blue Marshmallows @ Living Locurto
Sparkler Holders @ Delightfully Noted

Tin Can Luminaries @ Crafts for all Seasons
Red, White and Blue Cake @ The Bakery Spot
Patriotic Truffle @ Taste of Home
Tin Can Wind Socks @ Random Thoughts of a Supermom

Share your links for great 4th of July Party ideas!

Friday, July 1, 2011

. . . Fun Friday Finds--Jars . . .

It seems like I think of Mason Jars, or any jar for that matter, being used during many Independence Day Parties.  I love that people are not only using jars to decorate but also to serve food and drinks in!  Genius and inexpensive. 

I had to keep within our theme of Red, White and Blue so I tried really hard to gather up projects that fall within that range or have the potential to if you recreate them using those colors.


Cake in a Jar @  Babble Blogs
Pie in a Jar @ Mirabelle Creations
Jars for Candy Buffett @  Ruby Ju

Cupcakes in a Jar @ Tom Kat Studio
Mason Jar Lumineries @ Craft Gossip
Mason Jar Lanterns @ Sweet Something Design
Sippy Cup Jars @ Two Shades of Pink

Lemonade in a Jar @ Catch My Party
Mason Jar Mugs @ P is for Party
Cheesecake in a Jar @ My Baking Addiction
Jars for decorating @ Martha Stewart 


What do you like to serve in Jars?