Sunday, November 10, 2013

. . . Painted Mason Jar Christmas Arrangements . . .

I love all things Mason Jars but don't have a lot of them sitting around my house but if you walk into my garage I have them all over the place just waiting to be used in a project like this one.  It's like they keep calling my name in desperation so my husband won't throw them all away.  Believe me he has threatened to just trash all my little jars and containers that I now hoard but luckily he is too nice to do it for real.  Phew!

These are going to add such a great "pop" in your house and the best is that they can be used for any season!  It's as easy as buying some paint and a few little inexpensive items that you might just have around the house. 
 I have painted glass coffee bottles and loved how they turned out but always hated how the craft acrylic paint chipped right off when I would try to put flowers or something in them.  This time I had a brainstorm to use latex paint that I had in the garage to paint my jars and I loved how these turned out!  Believe me it's worth using the latex paint because once it's dry it doesn't just chip off--at least mine hasn't.  I don't want to make any promises in case you come back and tell me yours chipped but so far so good with mine.

This project really couldn't be easier and you will love getting compliments from everyone about how creative and crafty you are.  I promise I won't tell anyone that these are super simple and require very little effort.

You will need:
Clear Glass jars--these are Walmart brand canning jars so there was no logo on them
Paint--acrylic craft paint or latex paint in the color of your choice
Lids for your jars
Washi tape
Ribbon
Floral sprigs
Cardboard or heavy paper to drain the paint 
Wooden Skewers to keep the bottles up off the cardboard or paper (Brilliant Tip thanks to Landee See Landee Do)
 Prepare your work area with a piece of cardboard or heavy paper to drain the paint out of the bottles

 I used white latex paint with primer that I had leftover from some painting projects I recently finished.  I just spooned it into the jars and then swirled the paint to coat all the sides of the jars and then slowly let it drain to the very top of the jar and then flipped them upside down on my skewers so they would drain out.

 I left my jars to drain for the morning and then flipped them upright and let them dry overnight so they would be good and "Set" so they wouldn't chip when I put my floral arrangements together.

 I used the lid rims and covered them with washi tape and then screwed them on the jars.  My original plan was to use several thin pieces of ribbon to hang these glittery ornaments from the jar but I didn't end up liking the look of that.

 When the tape is on you are ready to work on the arrangement which is super simple!

 I decided to use sheer organza ribbon in red and just tied a piece around the jar just under the lid.

 To help old the floral sprigs in place I filled each jar with black beans but you could use rice or any floral foam to help hold them in place.  I just filled the jar 3/4 the way full of black beans.

 Then stick your floral arrangement in the jar making sure the "stems" are in the beans or rice or foam to make sure they stay put.  I just used 2 prearranged floral sprigs from the craft store so there was very very little work involved in this but they look so pretty!

 Easy as pie, right?  Nothing to it!

 So pretty for the holidays.

 Because I wanted the tape to show up I didn't fold the pine down around the lip of the jar but you could easily have something "draping" down over the sides of the jar if you didn't care to show the lid.

 These are now on a shelf I have on the landing of my steps and just add a nice pop of color to that small space.

I hope you enjoy making these too!  I love painting glass from the inside so it looks shiny and almost takes on a faux milk glass look.  Don't be afraid to use lots of fun colors too--it doesn't have to be just white paint.

Wednesday, November 6, 2013

. . . Holiday 2013 Shipping Schedule . . .

The Holiday Shopping Season has begun for 2013!  I wanted to share my cutoff dates for shipping and turnaround times.  Please order within 5 to 7 days of shipping deadlines.  I look forward to working with you!  www.itsybitsypaper.com

Friday, November 1, 2013

. . . no sew infinity scarf from a t-shirt . . .

I love love love scarves!  I like that they make me warm and cozy on a cold day but also that they really dress up any outfit.  I have several infinity scarves and love them but they are so long that I have to wrap them around my neck three times and then I look kind of like a clown because they are so bulky.  No one wants to look like a clown.

I was shopping this past weekend and saw a whole selection of knit infinity scarves and they were not very long so they were just the right "fullness".  I didn't buy one because I had the brainstorm to use t-shirts to make them myself.  The best part is that you don't have to sew anything!  Have I BLOWN Your Mind?  I now want to search Goodwill for every funky knit shirt I can find so I can make a ton of these.  So simple and they look great.

All you need is a pair of scissors and t-shirts.  

*One thing to keep in mind is that you want at least an XL or XXL sized shirt because of the length you will need.  I used men's shirts that my husband had but you can find tons of t-shirts in larger sizes at any store and of course any thrift shop.  I used t-shirts that had side seams but these scarves would be great using a shirt that had no side seams. 

A pile of t-shirts and scissors are the two things you need to have on hand.

Lay your shirt out flat making sure the hem matches up

Cut the shirt just above the hem so you have a "raw" edge on your scarf.

Then cut the t-shirt right under the arm holes so you end up with a rectangle of fabric.

Step inside the "loop" of your scarf and stretch it upright as much as you can so it gets as long as it can get so you have enough length to wrap around your neck.

Here you go!  You will get one scarf out of each t-shirt.  This one is my favorite with the gray fabric and black flecks but I made a ton of them out of shirts I had. 

Here are just a few infinity scarves I made

Now you need to run to the closet or to the store to get some t-shirts to make your own scarves!
 
Love these!  Wouldn't these make great gifts?

Thursday, October 31, 2013

. . . Happy Halloween Sale . . .

It's a Halloween Sale at www.itsybitsypaper.com!  

31% OFF all purchases today only.  Happy Halloween

www.itsybitsypaper.com

Thursday, October 24, 2013

. . . beefy taco bake . . .

We love anything "taco" in our house.  My son is a very picky eater but if I say tacos he is all over it with no questions asked.  When I ran across this recipe over on 30 Days I knew it had to be pinned and made as soon as possible.  I found out it's an old Campbell's Soup recipe but I'm sure over the years of it being passed along people have made it their own.  I doubled mine so we would have leftovers and I am glad I did because there wasn't all that much leftover after my two guys hit this hard.  It is a really yummy recipe and so easy!
 
I hope you enjoy it as much as we did.  Get the kiddos involved in helping pour everything.  My son loved dumping the salsa and soup and cheese and also helping tear up the tortillas.
 
 
**Photos below show a doubled recipe
 Beefy Taco Bake
You will need:
1 lb. ground beef
1 can condensed tomato soup
1 c. thick & chunky salsa
½ c. milk
6 flour or corn tortillas torn into 1″ pieces
1 c. shredded cheese
Optional sour cream

Preheat oven to 400 degrees. In a skillet over medium heat, cook beef until browned. Drain grease and add soup, salsa, milk, tortillas and half the cheese. Mix and spoon into a sprayed baking dish. Cover with foil and bake for 30 minutes or until hot and bubbly. Uncover and sprinkle with remaining cheese and bake until browned.

Serve with sour cream and enjoy! ♥
 
 Cut or tear up all your tortilla shells.

 Prepare your soup and salsa to be poured into the meat mixture

 You will need milk to make this nice and creamy

 Brown your ground beef and drain grease off it but leave it in the pan

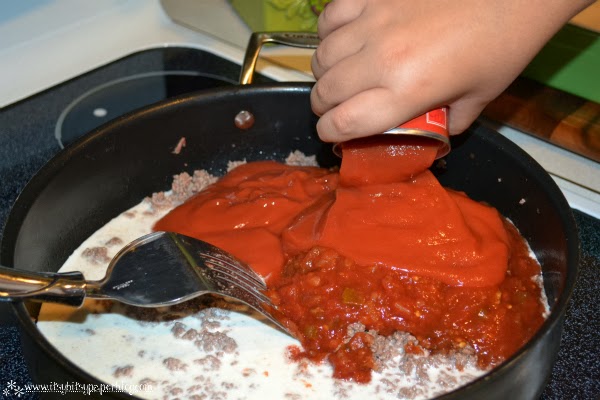
 Pour your soup, milk, salsa and tomato soup into the pan with the meat

 Add your torn up tortilla shells 

 Add your cheese and then mix well until it's all combined

 Pour the mixture into a sprayed casserole dish and cover with foil

 Right before the casserole is done baking add the rest of the cheese to the top and bake a few more minutes until it's nice and brown.  

 Serve with a scoop of sour cream and enjoy it!  I made taco rice and corn to go with ours and it was the perfect dinner.

Monday, October 21, 2013

. . . a few more designs . . .

Here are a few more new designs that are available now!

www.itsybitsypaper.com

Sunday, October 20, 2013

. . . New Designs . . .

I don't know about you but the holidays are creeping into my mind and I'm starting to think of what I need for gifts.  Well, today is your lucky day because there are some great new designs available in the shop.  Perfect for your holiday gifts.